There’s a special kind of magic when rapini’s bold, slightly bitter flavor meets soft, slow-cooked garlic and just the right touch of chili heat. This is the classic Italian combination that nonnas have relied on for generations, not because it’s fancy, but because the flavors simply work together, creating something unexpectedly harmonious and satisfying. Every bite has a balance of warmth, bitterness, and gentle spice that feels both rustic and refined.
Many people think they don’t like rapini, often because they’ve only had it overcooked or harshly prepared at restaurants. But when you cook the pasta and rapini together, then finish the dish with garlic-infused oil and a bit of starchy pasta water, the bitterness softens, and everything comes together silky and rich. With just five ingredients, one pot for pasta and rapini, one pan for garlic, and about 20 minutes, you end up with a simple yet deeply flavorful pasta that tastes far more impressive than it looks 🙂.
Ingredients
Ingredients for Rapini Pasta
For the pasta:- 400g linguine (or spaghetti)
- 1 bunch rapini (broccoli rabe), about 1 pound
- Salt for pasta water
- 4-5 garlic cloves, crushed
- ½ tablespoon chili flakes (adjust to taste)
- Extra virgin olive oil (about 1/3 cup, or enough to generously coat the pan)
- Parmigiano Reggiano, grated
- Extra virgin olive oil for drizzling
- Flaky salt
What Makes This Rapini Pasta Work
Before we start cooking, let’s talk about why this particular method produces such good results—and why it’s different from the typical “blanch, drain, sauté” approach many recipes use.
Cooking rapini with the pasta is the game-changer here. Most recipes have you blanch rapini separately, drain it, squeeze it dry, then sauté it. That works, but it’s extra dishes and extra steps. By adding rapini to the boiling pasta water during the last 4-5 minutes of cooking, they finish together. The rapini cooks through perfectly, the pasta absorbs some of that green flavor, and you save time and effort. Win-win-win.
Low-and-slow garlic infusion creates the base of your sauce. When you start garlic in cold oil over low heat, it slowly softens and becomes almost creamy without burning. This is completely different from adding garlic to hot oil (which can burn instantly) or high heat (which makes it bitter). According to food science explained by America’s Test Kitchen, building an emulsified sauce from pasta water and fat creates that glossy, restaurant-quality finish that makes simple pasta dishes special.
Pasta water creates the sauce. Here’s the science: when pasta cooks, it releases starch into the water. That starch acts as both an emulsifier (binding oil and water) and a thickener. When you add a ladle of this starchy water to your garlic-infused oil and toss in the pasta, you’re creating an actual sauce that clings to every strand. Without the pasta water, you’d just have oily noodles. With it, you have glossy, coated pasta that looks and tastes like it came from a trattor
ia.
The timing matters. By covering the garlic-oil-pasta water mixture while it simmers, you’re gently cooking the garlic through without it burning. The steam created under the lid keeps everything moist and helps flavors meld. Then, when you add the rapini and pasta, everything comes together in that final toss over heat.
Understanding Rapini (Broccoli Rabe)
If you’ve never cooked with rapini before, here’s what you need to know. It’s not actually broccoli, despite the name. It’s related to turnips, which explains the bitter edge. You’ll see long, slender stems with dark green leaves and occasional small florets that look like mini broccoli heads.
The bitterness varies by freshness and variety. Younger, smaller bunches tend to be milder. The stuff you get at farmers markets in spring is often sweeter than supermarket rapini in winter. According to Chowhound, rapini’s bitterness comes from compounds called isothiocyanates, which form when the vegetable is cut or chewed and cell walls break down. The more you chop it, the more bitter it becomes—which is why some cooks prefer leaving stems whole.
That said, brief boiling in well-salted water (which is what we’re doing when we add it to the pasta pot) mellows that bitterness significantly. The salt helps counteract bitter compounds, and the heat breaks down some of those isothiocyanates. You want rapini to retain some bitterness—that’s its character—but you don’t want it to be punishingly bitter.
When buying rapini, look for bunches with firm stems, dark green leaves without yellowing, and small, tight florets. Avoid bunches with thick, woody stems (those will be tough) or lots of yellowed, wilted leaves.
Step-by-Step Instructions
Step 1: Prep the Rapini
Start by washing your rapini thoroughly under cold running water. Dirt tends to hide in the leaves and florets, so give it a good rinse.
Grab each stem and cut off the tough, woody bottom inch or so. You’ll feel where the stem changes from tender to fibrous—that’s your cutting point. Some people cut off 2 inches, but unless the stems are really thick and woody, 1 inch is usually enough. Those stems contain good flavor, so don’t be overly aggressive with trimming.
That’s it for prep. No need to separate leaves from stems or chop anything. Keeping rapini relatively whole reduces cell damage and therefore reduces excess bitterness.
Step 2: Make the Garlic-Chili Oil Base
Get out a large skillet or sauté pan—something big enough to eventually hold all your pasta and rapini. Add a generous glug of extra virgin olive oil. You want enough to coat the bottom of the pan generously, about 1/3 cup.
Add your crushed garlic cloves and chili flakes to the cold oil. Starting with cold oil is crucial—it lets the garlic infuse the oil slowly without burning.
Place the pan over low heat. Let the garlic and chili gently sizzle and soften. You’re looking for the garlic to turn translucent and slightly golden around the edges, which takes about 5-7 minutes. The oil should be fragrant but not smoking. If you see the garlic browning quickly or the oil smoking, your heat is too high. Lower it immediately.
This slow infusion is what creates that sweet, mellow garlic flavor without any harsh, burnt notes. Patience here pays off enormously.
Step 3: Cook the Pasta
While your garlic is doing its thing, bring a large pot of water to a boil. And when I say large, I mean it—you want at least 4-5 quarts of water for 400g of pasta. More water means the pasta moves freely and cooks evenly.
Once the water is boiling hard, salt it well. The water should taste like the sea. This is your only opportunity to season the pasta from the inside, so don’t be shy. Add at least 2 tablespoons of salt, maybe more.
Add your linguine and stir immediately to prevent sticking. Check the package for cooking time and set a timer for about 4-5 minutes less than the recommended time. For example, if the package says 11 minutes, set your timer for 6-7 minutes. The pasta will finish cooking in the pan with the sauce, so you want it very al dente—still quite firm—when you add the rapini.
Step 4: Build the Sauce Base
Once your garlic has softened and become fragrant (after about 5-7 minutes), it’s time to start building your sauce.
Add one ladle (about 1/2 to 3/4 cup) of pasta cooking water to the skillet with the garlic and oil. It’ll sizzle dramatically—that’s good. The water will look cloudy and white because it’s full of starch from the pasta.
Cover the pan with a lid. This does two things: it creates a steam environment that gently finishes cooking the garlic without burning it, and it lets the starch, oil, and water start to emulsify into a sauce base. Let this simmer gently for 3-4 minutes while your pasta continues cooking.
Step 5: Add Rapini to the Pasta Pot
When your pasta timer indicates you have 4-5 minutes left (remember, you set it for less than the package time), add all your prepared rapini directly to the boiling pasta water.
Stir everything together. The rapini will seem like a huge volume at first, but it wilts down dramatically as it cooks—just like spinach. Make sure everything is submerged and moving around in the boiling water.
Let the pasta and rapini cook together for those final 4-5 minutes. The rapini stems should become tender but not mushy, and the pasta should be al dente—tender but still with a slight firmness when you bite it.
Before draining, taste a piece of pasta and a bit of rapini. The pasta should have just a hint of firmness in the center. The rapini stems should be tender enough to eat easily but still have some texture. If they’re not quite there, give it another minute.
Step 6: Combine Everything
Here’s where it all comes together, and timing matters.
Using tongs or a spider skimmer, transfer the pasta and rapini directly from the boiling water into your pan with the garlic-oil-pasta water mixture. Don’t drain them in a colander—you want them to bring some of that starchy cooking water with them into the pan.
Immediately start tossing everything together over medium heat. Use tongs or two wooden spoons to lift and turn the pasta and rapini, coating everything with the garlic oil and emulsified pasta water.
As you toss, the pasta will absorb liquid and the sauce will thicken and become glossy. This is the starch working its magic, binding the oil and water into a cohesive sauce that clings to every strand of pasta and piece of rapini.
If the pasta looks dry or the sauce seems tight, add another small ladle of pasta water and continue tossing. You want the pasta to be slick and glossy, not swimming in liquid but definitely not dry.
Taste and adjust salt as needed. The pasta water is already salted, but you might want a bit more. This is also when you’d add freshly ground black pepper if you want it.
Continue tossing for 1-2 minutes until everything is evenly coated and the pasta has finished cooking through to perfect al dente. The rapini should be integrated throughout, not sitting separately from the pasta.

Plating and Serving
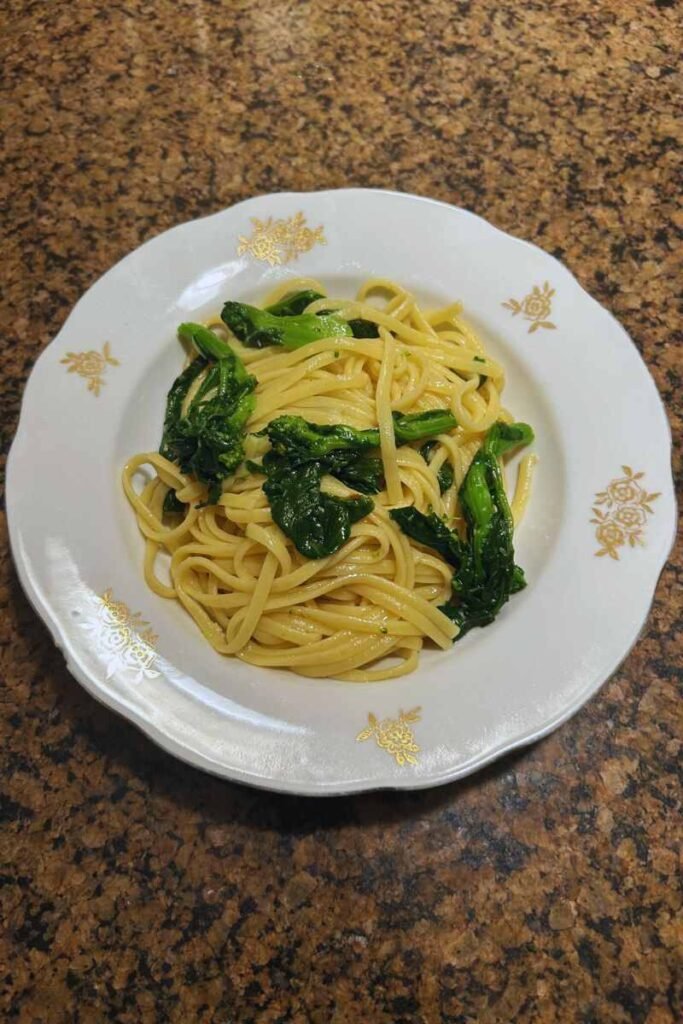
Transfer your pasta to a large serving bowl or individual plates. Don’t pile it too high—let it spread out a bit so you can see the beautiful contrast between the pale pasta and dark green rapini.
Drizzle with excellent extra virgin olive oil. This is your finishing touch, so use the good stuff—something peppery and fruity that adds flavor, not just richness.
If you’re using Parmigiano Reggiano, grate it generously over the top. The nutty, salty cheese plays beautifully against rapini’s bitterness. Some people love this combination; others prefer the cleaner, simpler flavor without cheese. Both ways are correct.
A sprinkle of flaky salt and maybe a few extra chili flakes for color and heat, and you’re done.
Serve immediately. Pasta waits for no one, and this dish is best when it’s piping hot with that sauce still glossy and clinging to the noodles.
Why This Recipe Works
The genius of this pasta is in its simplicity and technique. You’re not masking rapini’s assertive flavor—you’re supporting it with sweet garlic, heat from chili, richness from olive oil, and the creamy texture that starchy pasta water creates.
The method of cooking rapini directly in the pasta water is both practical (fewer dishes, less time) and flavorful (the pasta picks up some of that green, vegetal flavor). The slow-cooked garlic base provides sweetness without harshness. The pasta water creates an emulsified sauce that’s silky and cohesive rather than greasy or separated.
It’s the kind of dish that demonstrates how Italian cooking at its best isn’t about complicated techniques or expensive ingredients—it’s about understanding how flavors work together and applying simple techniques perfectly.
Variations and Substitutions
Different pasta shapes: Linguine is traditional, but this works beautifully with spaghetti, bucatini (thick, hollow spaghetti), or orecchiette (little ear-shaped pasta that catches the rapini in its cups). Short pasta like penne or rigatoni works too, though you lose some of the elegance of twirling long noodles with greens.
Anchovy addition: For a more complex, umami-rich version, add 3-4 anchovy fillets to the oil along with the garlic. They’ll dissolve as they cook, adding depth without fishiness. This is traditional in some regions of Southern Italy.
Add protein: Crumbled Italian sausage (cooked separately and added at the end) turns this into a heartier main course. Or toss in some white beans during the final combining step for a vegetarian protein boost.
Substitute greens: Can’t find rapini? Broccoli florets work, though they’re less bitter and have a different character. Mustard greens or turnip greens bring similar bitterness. Kale works in a pinch but is much milder.
Adjust heat: The 1/2 tablespoon of chili flakes provides moderate heat. Cut it to 1/4 tablespoon for mild, or increase to a full tablespoon if you like serious spice.
Lemon finish: A squeeze of fresh lemon juice right before serving adds brightness that some people love, though it will slightly dull the vibrant green color of the rapini.
Storage and Reheating
Leftovers keep for 2-3 days refrigerated in an airtight container. The pasta will absorb more liquid as it sits, so it won’t be quite as saucy when reheated.
Reheat gently in a skillet over medium-low heat, adding a splash of water or olive oil to loosen the pasta and recreate some of that glossy texture. Microwave reheating works too but won’t give you the same results—the pasta tends to dry out and the rapini can get mushy.
Honestly though, this is a dish best eaten fresh. Make what you’ll eat in one meal, or be prepared for slightly less optimal leftovers.
Tips for Success
Don’t skip the pasta water. It’s what makes this dish work. Without it, you just have oily, dry pasta. With it, you have a cohesive, restaurant-quality dish.
Keep garlic on low heat. Burnt garlic is bitter and acrid. Slow and steady wins this race.
Salt your pasta water generously. This is your only chance to season the pasta itself from within. Undersalted pasta water means bland pasta no matter how much you adjust later.
Don’t overcook the rapini. You want it tender but still with some texture. Mushy, army-green rapini is sad rapini.
Work quickly at the end. Once you combine everything in the pan, work fast. The residual heat continues cooking, and you don’t want to overcook the pasta or let the sauce separate as it sits.
Use good olive oil. You’ll taste it, especially in that final drizzle. This isn’t the place for your bottom-shelf cooking oil.
Final Thoughts
This rapini pasta represents everything I love about Italian cooking—ingredients you can count on one hand, techniques that are straightforward but require attention, and flavors that are bold and unapologetic. It’s not trying to be subtle or refined. It’s assertive, garlicky, spicy, and deeply satisfying.
The first time you make this, you might be skeptical about how something so simple could be so good. But when you taste how that garlicky oil, starchy pasta water, and bitter rapini come together into something greater than its parts, you’ll get it. You’ll understand why Italian grandmothers have been making versions of this for generations.
Make it on a weeknight when you want something fast but flavorful. Make it for friends who claim they don’t like bitter greens and watch them change their minds. Make it for yourself when you need comfort food that doesn’t feel heavy.
And if you do fall in love with rapini (as I hope you will), start exploring all the other ways to use it—on pizza, in sandwiches with sausage, sautéed as a side dish, even in frittatas. But this pasta is a perfect place to start.
Serves: 3-4
Total time: About 20 minutes
Level: Easy
Now go grab some rapini and make yourself some proper Italian pasta. Your kitchen will smell amazing, and your dinner will taste even better.