Let’s be real: tomahawk steaks are theater. That massive bone handle, the ridiculous size, the way it looks when you carry it to the table. People lose their minds. It’s the steak equivalent of driving up in a sports car. And if you’re here to figure out how to cook a BBQ tomahawk steak, you’re in the right place.
But here’s what most people don’t realize, cooking a tomahawk isn’t any harder than cooking a regular ribeye. It’s just bigger and more dramatic. The technique is dead simple: sear it hot, finish it slow, rest it properly. That’s literally it. The big bone even works in your favor by helping the meat stay juicy while the outside gets that deep, golden crust.
I’ve cooked probably twenty tomahawks at this point, and I’ve figured out what works and what’s just Instagram nonsense. You don’t need fancy tools or chef-level skills. A grill, a thermometer, and the patience to not flip it fifty times is all it takes. Follow these steps and you’ll hit perfect medium-rare every time. 🙂
Ingredients You’ll Need
This is one of the most minimalist recipes out there. The steak is the star, everything else just supports it.
Ingredients for a BBQ Tomahawk Steak
- 1 tomahawk steak (2–2.5 inches thick)
- Kosher or sea salt
- Fresh cracked black pepper
- 1–2 tbsp olive oil
- 2–3 sprigs rosemary or thyme (optional)
- 2 tbsp butter (optional)
1 tomahawk steak (2-2.5 inches thick): This is a bone-in ribeye with an extra-long rib bone left attached (usually 6-8 inches). The bone is purely aesthetic, it doesn’t add flavor like some people claim, but it does help regulate temperature during cooking. Look for good marbling (those white fat streaks running through the meat) and at least 2 inches of thickness. Thinner tomahawks cook too fast and you lose that perfect gradient from crust to rare center.
Salt (kosher or sea salt): This is non-negotiable. Kosher salt is ideal because the larger crystals stick to the meat better and create better crust development. Don’t use table salt, it’s too fine and you’ll over-salt. You need way more salt than you think. We’re talking tablespoons, not pinches.
Fresh cracked black pepper: Use a pepper mill and crack it fresh right before cooking. Pre-ground pepper tastes like dust. The coarse texture of freshly cracked pepper creates little pockets of intense flavor in the crust.
1-2 tbsp olive oil: This helps the salt and pepper stick to the meat and promotes browning through the Maillard reaction. Don’t use extra-virgin olive oil, its smoke point is too low. Regular olive oil or avocado oil work great.
2-3 sprigs rosemary or thyme (optional): Fresh herbs add aromatic complexity in the final minutes. Rosemary is classic with beef. These are genuinely optional, a perfectly seasoned tomahawk needs nothing else.
2 tbsp butter (optional, for finishing): Restaurant steaks often get a butter finish for extra richness and gloss. Completely optional but undeniably delicious.
Before You Start: What You Need to Know
Tomahawk steaks are expensive, usually $50-100 depending on quality and weight. Don’t screw it up by rushing or guessing. Here’s what you absolutely need to understand.
Temperature is everything. You cannot eyeball doneness on a steak this thick. You need an instant-read meat thermometer. Period. Guessing leads to overcooked, $80 disappointment. According to experts, medium-rare beef reaches 130-135°F, but experienced cooks pull at 125-130°F to account for carryover cooking during rest.
Two-zone heat is mandatory. You cannot cook a tomahawk properly over uniform heat. You need a hot zone for searing and a cooler zone for gentle finishing. This reverse-sear adjacent method gives you that restaurant-quality crust without overcooking the interior.
Resting isn’t optional. When you pull a steak off high heat, the juices are all concentrated in the center, pushed there by the heat. Resting allows those juices to redistribute throughout the meat. Cut into it immediately and all that moisture runs onto your cutting board instead of staying in the steak.
The bone takes up volume. A 3-pound tomahawk isn’t 3 pounds of meat, probably 2-2.5 pounds after you account for that giant bone. Plan portions accordingly. One tomahawk typically feeds 2-3 people generously.
Step-by-Step Instructions (The Real Way)
Alright, let’s cook this beast. Pay attention to timing and temperatures.
Step 1: Bring to Room Temperature
Take the steak out of the fridge 45-60 minutes before you plan to grill it. This is important. Cold meat doesn’t cook evenly, the outside overcooks while the center stays cold. Room temperature meat develops better crust and cooks more uniformly.
Leave it on a plate or cutting board, uncovered. Don’t worry about food safety, an hour at room temp isn’t long enough for bacteria to become problematic on the exterior of whole muscle meat.
Step 2: Season Generously
Pat the steak completely dry with paper towels. Moisture is the enemy of crust formation. You want that surface bone-dry.
Rub both sides lightly with olive oil, just enough to create a thin coating. Now season aggressively with salt. I’m talking way more than feels right. A steak this thick needs heavy seasoning because only the surface gets salt. Use at least a tablespoon per side, probably more. Press it into the meat so it adheres.
Crack fresh black pepper generously over both sides. Don’t be shy. The pepper adds flavor and textural contrast to the crust.
Let it sit for 10-15 minutes after seasoning. The salt will start pulling moisture to the surface, which then gets reabsorbed along with the salt. This creates better seasoning penetration.
Step 3: Prepare Your Grill for Two-Zone Cooking
You need high heat on one side, medium-low on the other. Here’s how:
For charcoal: Bank all the coals on one side of the grill. That side is your hot zone (direct heat). The empty side is your cool zone (indirect heat). You want the hot side screaming hot, 450-500°F, and the cool side around 300-350°F.
For gas: Turn burners on one side to high, burners on the other side to low or medium-low. Same principle, create distinct temperature zones.
Target overall grill temperature around 400-450°F when the lid is closed. Use the thermometer built into your grill lid, or better yet, get a separate grill thermometer because built-in ones often lie.
Step 4: Sear Hard on Direct Heat
Place the steak directly over the hottest part of the grill. You should hear an immediate, aggressive sizzle. If you don’t, your grill isn’t hot enough, close the lid and wait.
Sear for 2-3 minutes without moving it. Resist the urge to flip, poke, or adjust. Let it sit there and develop crust. If you want those Instagram-worthy crosshatch grill marks, rotate the steak 90 degrees halfway through each side (so 1.5 minutes, rotate, another 1.5 minutes, flip).
Flip once and sear the other side for another 2-3 minutes. You’re looking for a deep brown, almost charred crust. This is where flavor comes from. The Maillard reaction, the chemical process that creates the complex flavors in browned meat, requires high heat and dry surface.
Don’t forget to sear the edges too. Stand the steak up on its fat cap and sear that for 30-60 seconds. Render some of that fat and crisp it up.
Step 5: Finish on Indirect Heat
Move the steak to the cool side of the grill, away from direct flames. Close the lid. Now we’re cooking low and slow to bring the internal temperature up without burning the exterior.
This takes 15-25 minutes depending on your grill temperature, steak thickness, and desired doneness. Flip once halfway through to promote even cooking.
Insert your instant-read thermometer into the thickest part of the meat, avoiding the bone (bone conducts heat differently than meat and gives false readings). You’re targeting:
- 125-130°F for medium-rare (my recommendation)
- 130-135°F for medium
- 120-125°F if you like rare
Pull the steak about 5 degrees before your target temperature. Carryover cooking will bring it up during the rest period.
Step 6: Optional Herb and Butter Finish
In the last 2 minutes of cooking, you can add aromatic flair. Toss fresh rosemary or thyme sprigs directly on top of the steak. Place a tablespoon of butter on the steak and close the lid. The butter melts and bastes the meat while the herbs release their oils.
This step is pure luxury, not necessary, but it adds that restaurant polish. The herbs perfume the meat without overpowering the beef flavor.
Step 7: Rest (This Is Where Most People Fail)
Pull the steak off the grill when it hits your target temp minus 5 degrees. Transfer it to a cutting board or plate and tent loosely with foil.
Now walk away for 10-15 minutes. Seriously. Set a timer if you have to. This is the hardest part because it smells incredible and you’re starving, but resting is non-negotiable.
During this rest, the internal temperature will rise another 5 degrees (carryover cooking), and the juices will redistribute throughout the meat. A properly rested steak loses almost no juice when you slice it. A steak cut immediately bleeds all over the board.
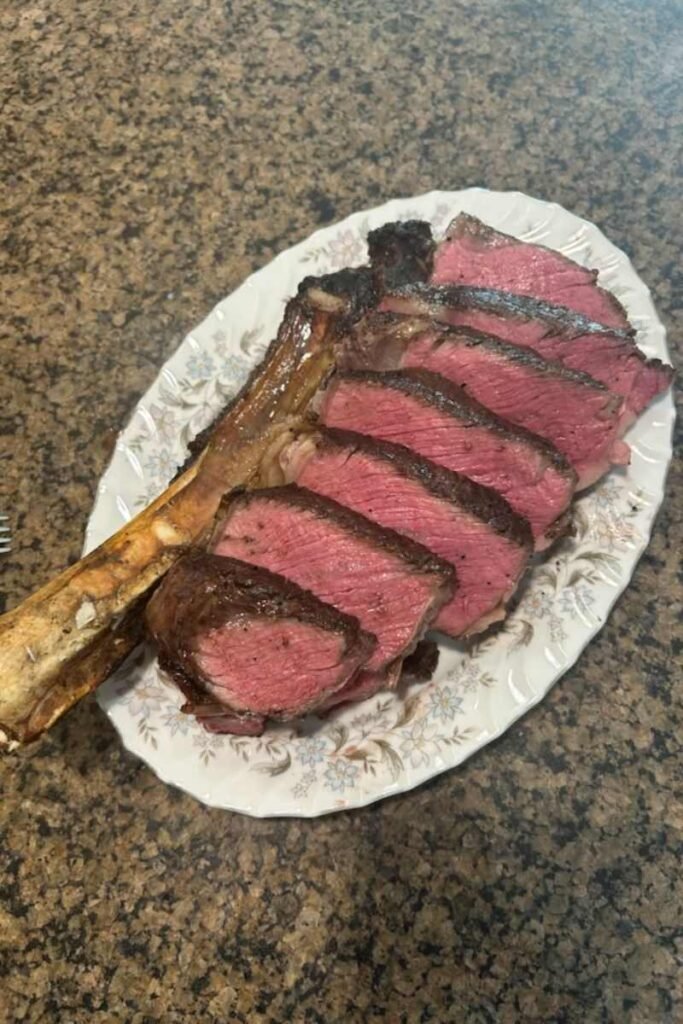
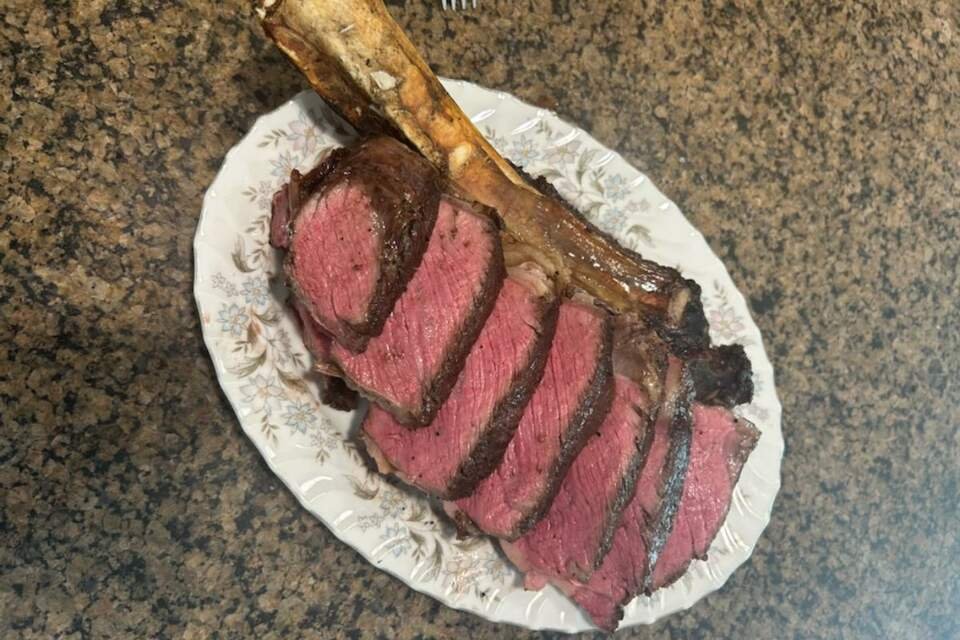
Step 8: Slice and Serve
After resting, slice the meat against the grain into strips about 1/2 inch thick. You can serve it right on the bone for maximum drama, or slice it off the bone first for easier eating.
Finish with a sprinkle of flaky sea salt (like Maldon) if you want. The crunchy texture and bright salinity enhance the beef flavor without making it taste salty.
Serve immediately. This steak waits for no one.
Common Mistakes and How to Avoid Them
I’ve screwed up expensive steaks. Learn from my pain.
Don’t skip the room temperature step. Cold steak from the fridge cooks unevenly. The outside overcooks before the inside warms up. Give it that hour.
Don’t under-season. A thick steak needs aggressive seasoning. What feels like too much salt is probably just right. The interior of the steak has zero seasoning, only the surface does.
Don’t flip constantly. I know it’s tempting, but flipping repeatedly prevents good crust formation. Sear once per side during high heat, flip once during indirect heat. That’s it. Four total flips maximum.
Don’t guess on temperature. Just buy a damn thermometer. They’re $15 on Amazon. Guessing on a $75 steak is insane.
Don’t skip resting. Cutting into steak immediately after cooking releases all the juice onto your cutting board. Those juices should be in the meat, not wasted. Rest it. Always.
Don’t cook past medium. A tomahawk is pure ribeye, arguably the most flavorful, well-marbled steak cut. Cooking it past medium turns that beautiful fat into dry, chewy disappointment. If someone wants well-done, they can have chicken.
Tips for Perfect Results Every Time
Want to level up? Here’s the insider knowledge.
Dry brine the night before. Season your steak with salt 12-24 hours before cooking and leave it uncovered in the fridge. The salt penetrates deep into the meat, and the surface dries out completely for better crust. This is next-level technique that separates good from great.
Use a drip pan under the indirect zone. Fat renders off during cooking and can cause flare-ups or create acrid smoke. A simple aluminum pan filled with water under the cool zone catches drippings and adds moisture to the cooking environment.
Let your grill heat for 15 minutes minimum. A properly preheated grill maintains temperature better and creates better sear marks. Don’t rush this step.
Bone presentation matters. Wrap the exposed bone in foil during cooking if you want it pristine and Instagram-ready. Otherwise it gets charred and sooty. Purely aesthetic choice.
Invest in good charcoal if you’re using it. Lump charcoal burns hotter and cleaner than briquettes. The flavor difference is subtle but noticeable.
Rest on a wire rack. If you rest the steak directly on a board or plate, the bottom sits in its own juices and the crust softens. A wire rack lets air circulate all around, keeping the crust intact.
Frequently Asked Questions
Can I cook this in the oven instead of grilling?
Yes. Sear it in a cast iron skillet on the stovetop (2-3 minutes per side over high heat), then transfer to a 275°F oven to finish (15-25 minutes to target temp). You lose the smoke flavor but the technique works great.
How do I know when it’s done without a thermometer?
You don’t. Seriously. Buy a thermometer. The “poke test” or “hand comparison” methods are wildly inaccurate on steaks this thick.
Can I reverse sear instead?
Absolutely. Cook it low and slow first (indirect heat only until internal temp hits 115-120°F), then sear hard at the end over direct heat. Some people prefer this method. Both work.
What if my grill temperature is too high/low?
Too high: Move the steak further from direct heat or close vents partially. Too low: Add more charcoal or crank up burners. You need that 400-450°F range for proper cooking time.
How long can the steak sit after seasoning?
Hours if you’re dry brining, 15-30 minutes minimum if you’re not. The salt needs time to work its way into the meat.
What sides go with tomahawk steak?
Keep it simple. Roasted vegetables, baked potatoes, grilled asparagus, Caesar salad. The steak is the star, don’t overcomplicate things.
Can I use this method for other thick steaks?
Yes. This technique works for any thick-cut steak: porterhouse, T-bone, bone-in ribeye, even thick filets. Adjust cooking time based on thickness.
Conclusion: Your New Signature Move
Tomahawk steaks look intimidating, but the cooking process is straightforward. Master this technique and you’ve got an impressive dinner party move that’ll make you look like a grilling legend.
The key points: room temperature start, aggressive seasoning, two-zone cooking (hot sear then gentle finish), accurate temperature monitoring, and proper rest. Follow those principles and you’ll nail it every time.
Yes, tomahawks are expensive. But cooked correctly, they’re worth every penny. That perfect medium-rare interior with the charred, flavorful crust is one of the best eating experiences in all of cooking. It’s pure, simple, and primal, great meat cooked over fire.
Next time you want to seriously impress someone, grab a tomahawk. Fire up the grill. Follow these steps. Watch their face when you bring that ridiculous, beautiful steak to the table.
Now go buy the biggest, most dramatic piece of meat you can find. Your grill is waiting.