I used to think making Homemade Pizza with Sausage was something only pros with fancy ovens and Italian grandparents could pull off. Then one night, craving pizza but too lazy to order delivery, I tried making it myself. The first attempt was awful, cardboard crust, toppings sliding everywhere, the whole disaster.
But I kept at it, and by the fifth try the crust finally had the right chew, the sausage flavored every bite, and the mushrooms, olives, and tomatoes actually worked together instead of fighting for attention. Now I make it twice a month, people ask for it, and this recipe is the simple, no-special-equipment version anyone can pull off. 🙂
What Makes This Pizza Different
Most homemade pizza recipes either oversimplify the dough or overcomplicate the process. This one finds the middle ground. The fennel-spiced Italian sausage brings an aromatic complexity you won’t get from generic pepperoni. The combination of fresh tomatoes, mushrooms, and Kalamata olives creates layers of flavor—sweet, umami, and salty all working together.
According to Stadler Made, the Maillard reaction that occurs during high-heat baking is crucial for developing pizza’s characteristic flavors and textures. That golden-brown crust you’re after? It’s science, and this recipe delivers it.
The dough itself uses a three-fold rest technique that develops gluten without aggressive kneading. It’s more forgiving than traditional methods and produces consistently great results.
Ingredients You’ll Need
Ingredients You’ll Need
For the Pizza Dough:- 500g all-purpose flour (00 flour if you can find it—it makes a difference)
- 300g water (room temperature)
- 50g extra-virgin olive oil
- 7g salt (about 1¼ teaspoons)
- 7g granulated sugar (about 1½ teaspoons)
- 3g dry yeast (about 1 teaspoon) or 10g fresh yeast
- Extra olive oil for greasing
- 200g diced tomatoes (fresh or canned, drained)
- 1 Italian sausage with fennel, cut into bite-sized pieces
- ½ medium onion, thinly sliced
- 150–200g mushrooms, sliced (cremini or button work great)
- 15 Kalamata olives, halved and pitted
- Handful of grated Parmesan cheese (about 30–40g)
- Extra-virgin olive oil for drizzling
- 1 teaspoon dried oregano
- Salt and freshly cracked black pepper
These ingredients come together to make a rustic, flavor-packed pizza with a chewy homemade crust and savory toppings that balance each other perfectly.
The ingredient list might look long, but most of this is pantry staples. The only specialty item is the fennel sausage, and honestly, it’s worth seeking out. That anise-forward flavor is what makes this pizza memorable.
Kitchen Equipment
You’ll need a large mixing bowl, a pitcher or measuring cup, a wooden spoon or your hands for mixing, a clean work surface, a baking tray (preferably rimmed), plastic wrap or a clean kitchen towel, and a sharp knife. No stand mixer required, no pizza stone necessary, no special equipment beyond basic kitchen tools.
Making the Pizza Dough (The Foundation of Everything)
Mix your dry ingredients first: combine the 500g flour, sugar, and yeast in a large bowl. Whisk them together so the yeast distributes evenly. This prevents clumping and ensures even fermentation.
Combine your wet ingredients: in a pitcher, mix the water, salt, and olive oil. Dissolving the salt in the water prevents it from directly contacting the yeast, which can slow activation. This sequencing matters more than most home bakers realize.
Bring them together: pour the liquid mixture into the dry ingredients and mix until everything comes together. Don’t stress about it looking perfect—shaggy is fine at this stage. Once no dry flour remains, you’re ready for the next step.
Knead until smooth and elastic: turn the dough onto a lightly floured surface and knead for about 8-10 minutes. You’re looking for smooth, springy dough that bounces back when poked. If you’ve never kneaded dough before, it’s a push-fold-turn rhythm. Push the dough away with the heel of your hand, fold it back over itself, turn it 90 degrees, repeat.
Here’s where this recipe gets clever: the fold-and-rest technique. Lightly oil your work surface and the dough ball. Stretch the dough into a rough rectangle, fold it in thirds like a letter, rotate 90 degrees, fold again. Let it rest for 20 minutes covered with a towel. Repeat this folding process twice more—fold, rest 20 minutes, fold, rest 20 minutes, fold one last time.
This technique develops gluten structure through gentle manipulation rather than aggressive kneading. It creates better texture with less effort, and honestly, it feels kind of meditative.
Shape into a ball and place it in a generously greased bowl. Roll it around to coat the surface in oil—this prevents a dry skin from forming. Cover tightly with plastic wrap or a damp towel and let it rise for 3 hours at room temperature.
The dough should triple in size. When it’s ready, it’ll be puffy, soft, and slightly jiggly. If you poke it, the indentation should slowly spring back. If you want even better flavor, you can do a 24-hour cold rise in the refrigerator after the initial rise. Just bring it back to room temperature before stretching (about an hour on the counter).
Preparing Your Toppings (Don’t Skip This Step)
While your dough rises, prep your toppings. Slice your mushrooms about ¼-inch thick—not too thin or they’ll disappear, not too thick or they won’t cook through. Slice the onion into thin half-moons. Halve and pit your Kalamata olives. Cut the sausage into bite-sized pieces, removing the casing first if it came in links.
Dice your tomatoes if using fresh, or drain canned tomatoes well. Excess moisture is pizza’s enemy—it creates a soggy crust. If your tomatoes seem particularly wet, spread them on paper towels for 10 minutes to absorb excess liquid.
Grate your Parmesan if you bought a block (which you should—pre-grated doesn’t melt the same way). Having everything ready before you start assembly makes the process smooth and prevents that panicked “where did I put the oregano” moment while your stretched dough sits there getting sad.
Stretching the Dough (Easier Than You Think)
Preheat your oven to 400°F (205°C). Give it a full 20 minutes to heat thoroughly. A properly heated oven is crucial for good crust development.
Lightly oil your baking tray—a rimmed sheet pan works perfectly. You’re aiming for a thin coating that prevents sticking without creating an oil slick.
Stretch the dough on the oiled tray rather than stretching it first and then transferring. This prevents the dreaded “dough that shrinks back immediately” problem. Start from the center and push outward with your fingertips, working the dough toward the edges of your pan. Don’t worry about perfect circles or rectangles—rustic is charming, and honestly, irregular shapes cook fine.
If the dough resists and keeps springing back, let it rest for 5 minutes. Gluten relaxes with rest, making stretching easier. I usually get it about 80% stretched, let it rest while I organize toppings, then finish stretching it to the edges.
Create a slight rim around the edges by pushing dough away from the very edge—this becomes your crust and prevents toppings from sliding off.
Assembly (Where It All Comes Together)
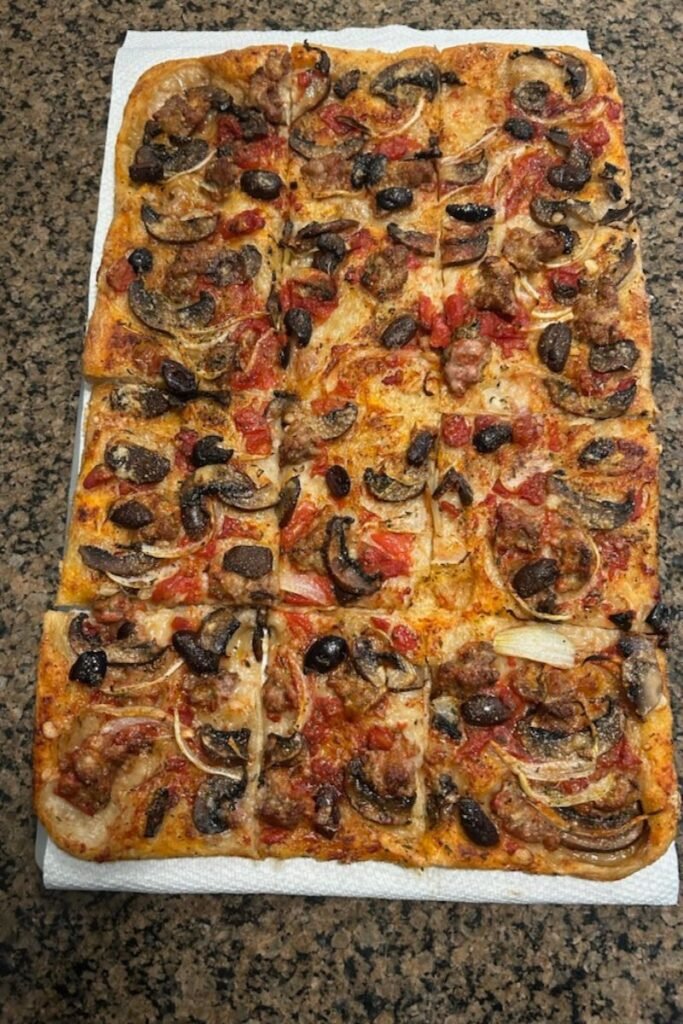
Now for the fun part. Start with your diced tomatoes, spreading them relatively evenly across the dough but leaving that rim uncovered. Don’t sauce this pizza traditionally—the fresh tomato chunks create pockets of bright flavor rather than a uniform sauce layer.
Scatter the mushrooms across the surface. They’ll shrink during cooking and release moisture, so don’t be shy—use all of them. Distribute the onion slices evenly. Add the sausage pieces, spacing them so every slice gets some. Scatter the halved Kalamata olives throughout.
Sprinkle the oregano over everything—dried oregano blooms beautifully in the oven’s heat. Season with salt and pepper. Go light on the salt since olives, sausage, and Parmesan all contribute saltiness. Finish with grated Parmesan distributed across the top.
The final crucial step: drizzle extra-virgin olive oil over the entire pizza. This isn’t optional. The oil carries heat to the toppings, helps everything brown beautifully, and adds richness. I use about 2-3 tablespoons, moving in zigzag patterns across the whole surface.
Baking (Where Magic Happens)
Slide your pizza into the preheated 400°F (205°C) oven. Middle rack works best for even heat distribution. Set a timer for 18 minutes, but start checking at 15 minutes.
You’re looking for golden-brown crust on the edges and bottom, bubbling cheese, and slightly caramelized toppings. The sausage should be cooked through, the mushrooms should have shrunk and browned slightly, and those tomatoes should look concentrated and jammy at the edges.
Depending on your oven, this might take anywhere from 18-22 minutes. My oven runs hot and usually finishes around 19 minutes. If your crust is browning too quickly but toppings aren’t done, tent loosely with foil for the last few minutes.
The bottom crust should be golden and firm enough to support the toppings when you lift a slice. If it’s pale or floppy, give it another 2-3 minutes. Research from the International Journal of Gastronomy and Food Science indicates that optimal pizza crust development occurs between 205-220°C, with texture heavily influenced by baking time and temperature accuracy.
Cooling & Serving (Patience, Young Padawan)
Let the pizza rest for 3-5 minutes after removing it from the oven. I know this is torture when it smells that good, but this brief rest lets the cheese set slightly and makes slicing infinitely easier. Plus, molten cheese will absolutely destroy the roof of your mouth—I’ve learned this lesson multiple times and still occasionally ignore my own advice.
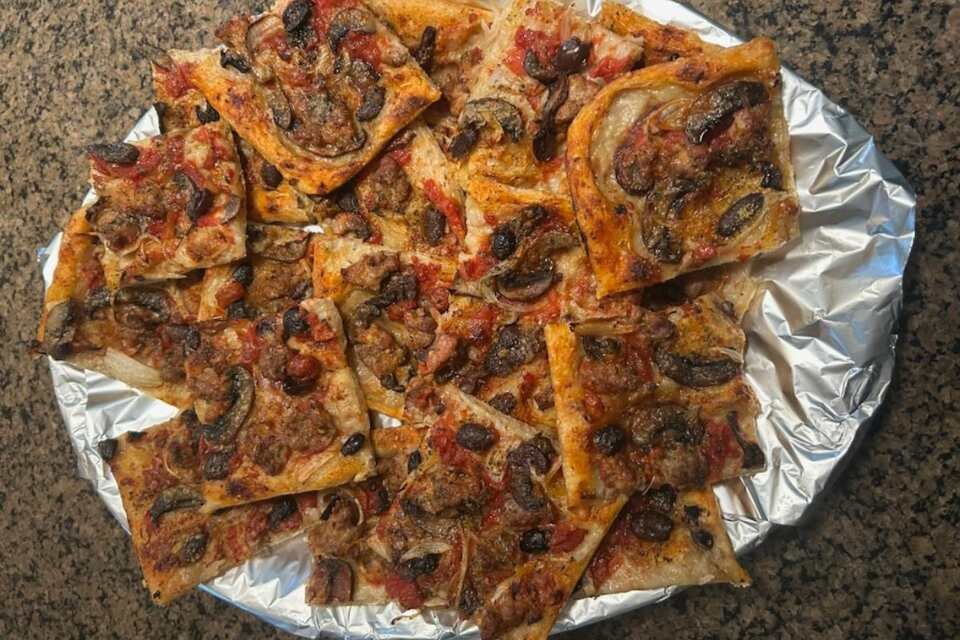
Slice and serve immediately. I use a pizza cutter for clean cuts, but a large sharp knife works too. Rocking the knife back and forth rather than pressing straight down prevents toppings from sliding around.
This pizza is best eaten fresh, but leftovers keep in the fridge for 2-3 days. Reheat in a 350°F oven for 8-10 minutes—never microwave pizza unless you enjoy rubber crust.
Pro Tips From Someone Who’s Made This Way Too Many Times
00 flour makes a difference. It’s finely ground Italian flour designed specifically for pizza and pasta. The texture it creates is noticeably lighter and more tender than all-purpose flour. Worth seeking out at Italian markets or ordering online, but all-purpose works perfectly fine if you can’t find it.
Don’t overload the toppings. More isn’t always better—too many toppings create moisture that makes crust soggy and prevents proper browning. This recipe hits the sweet spot, but resist the urge to add more.
Preheat that baking tray if you want an even crispier bottom. Put your oiled tray in the oven during preheating, then carefully stretch your dough directly on the hot tray. This creates immediate bottom crust browning.
Fresh mozzarella is NOT recommended here. It contains too much moisture for this style of pizza. Parmesan provides enough cheese flavor without the sogginess fresh mozzarella would create.
Experiment with the sausage. Italian sausage with fennel is traditional and delicious, but sweet Italian, spicy Italian, or even crumbled regular breakfast sausage all work. Just avoid anything pre-cooked—raw sausage releases flavor into the pizza as it cooks.
The cold rise really does improve flavor. If you have time, after that initial 3-hour rise, punch down the dough, reshape it, and refrigerate for up to 24 hours. The slow fermentation develops complex flavors you simply can’t achieve with quick rises. Bring it to room temp before using.
Variations & Customizations
The base dough and technique work with virtually any topping combination. Swap mushrooms for bell peppers. Replace olives with artichoke hearts. Add fresh basil after baking for brightness. Use spicy Italian sausage if you like heat.
I’ve made this with caramelized onions instead of raw (incredible but time-consuming), added roasted red peppers from a jar (easy flavor boost), and even experimented with truffle oil as the final drizzle (delicious but not for everyone).
For a white pizza version, skip the tomatoes entirely and add ricotta dollops before baking. For vegetarian, eliminate sausage and double the mushrooms. The formula is forgiving and welcomes improvisation.
Why This Recipe Works
The fold-and-rest dough technique develops gluten gently, creating extensibility without toughness. The three-hour rise allows proper fermentation for flavor development. The raw topping approach means everything cooks together, allowing flavors to meld.
The specific combination of toppings isn’t random—fennel sausage provides aromatic fat, tomatoes contribute acid and sweetness, mushrooms add earthiness, olives bring salinity, and Parmesan ties everything together with umami depth. According to The Kitchn, balancing these five flavor profiles is key to memorable pizza.
Baking at 400°F rather than the traditional 500°F+ means home ovens can actually achieve the results. Professional pizza ovens hit 800°F+, but lower temperature with longer baking time produces excellent results in standard home ovens.
Storage & Make-Ahead Options
The dough can be made up to 3 days ahead and refrigerated. Just bring it to room temperature before stretching. You can also freeze portioned dough for up to 3 months—thaw overnight in the fridge, then bring to room temp.
Prepped toppings keep 1-2 days refrigerated. Slice everything, store in separate containers, and assembly becomes a 5-minute job. Don’t pre-drain tomatoes more than a few hours ahead or they’ll get mushy.
Baked pizza freezes reasonably well. Cool completely, wrap tightly in plastic wrap then foil, freeze up to 2 months. Reheat from frozen at 375°F for 15-20 minutes. It won’t be quite as good as fresh, but it’s perfectly acceptable for quick meals.
Common Mistakes & How to Avoid Them
Rushing the rise. Dough that hasn’t properly risen won’t have good flavor or texture. If your kitchen is cold, put the bowl in a turned-off oven with the light on—the bulb provides gentle warmth.
Stretching dough straight from the fridge. Cold dough tears easily and springs back constantly. Always let refrigerated dough come to room temperature first.
Overloading toppings. I’ve said it before, but it bears repeating. Soggy crust is almost always from too many toppings or wet toppings. Less is more.
Skipping the oil drizzle. That final olive oil application makes an enormous difference in flavor and texture. Don’t forget it.
Using a cold oven. Proper preheating ensures the crust starts cooking immediately when the pizza goes in. Cold ovens = soggy bottoms.
Final Thoughts
I’ve made a lot of pizza in my life—from failed first attempts to versions that rivaled my favorite pizzeria. This recipe represents what I’ve learned works consistently in a regular home kitchen with regular equipment.
There’s something deeply satisfying about making pizza from scratch. The process is tactile and engaging without being difficult. The smell that fills your kitchen while it bakes is worth the effort alone. And the moment you pull that golden, bubbling pizza from the oven? That’s victory.
You don’t need a wood-fired oven or years of experience. You just need decent ingredients, a little patience, and willingness to learn from your attempts. Your first pizza might not be perfect. Mine certainly wasn’t. But by your third or fourth try, you’ll be making pizza that makes people genuinely impressed.
So grab your flour, round up those toppings, and make this pizza. Your kitchen will smell incredible, you’ll feel accomplished, and you’ll have dinner that’s infinitely better than delivery.
Trust me on this one—it’s worth getting your hands a little doughy for.