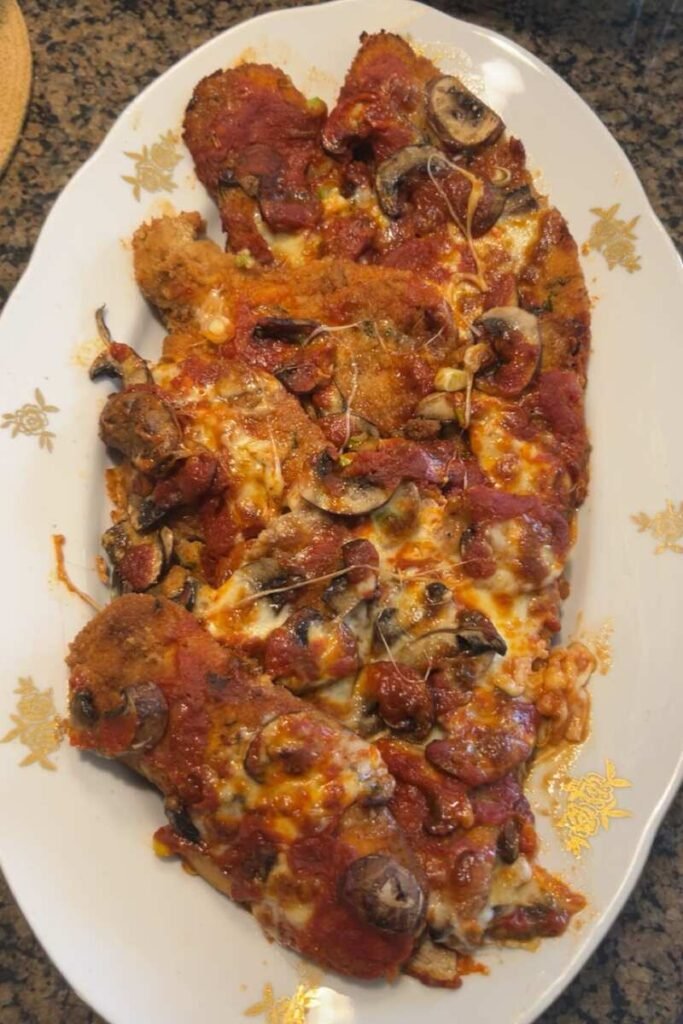
This streamlined chicken Parmesan technique eliminates multiple cooking steps by assembling raw mushrooms and aromatics directly into the baking dish, allowing them to cook simultaneously with the breaded chicken. The method produces a unified, flavor-rich casserole where vegetable juices mingle with tomato sauce and melted cheese, creating a more cohesive dish than traditional approaches that cook components separately.
Understanding the Baked-In Method
Traditional chicken Parmesan requires pan-frying chicken until fully cooked, then assembling with sauce and cheese before a brief bake to melt the topping. This baked-in variation reduces active cooking time by finishing the chicken in the oven while simultaneously cooking mushrooms and green onions from their raw state. The extended oven time allows flavors to meld while the chicken’s breading maintains its crispy texture under a protective layer of sauce and cheese.
The mushrooms release moisture as they cook, which concentrates into the sauce rather than creating sogginess. Green onions add sharp, fresh allium flavor that mellows during baking without the harshness of raw onions. This approach works particularly well for weeknight meals, reducing stovetop monitoring while producing restaurant-quality results.
Ingredients
Ingredients for Chicken Parmesan with Mushrooms
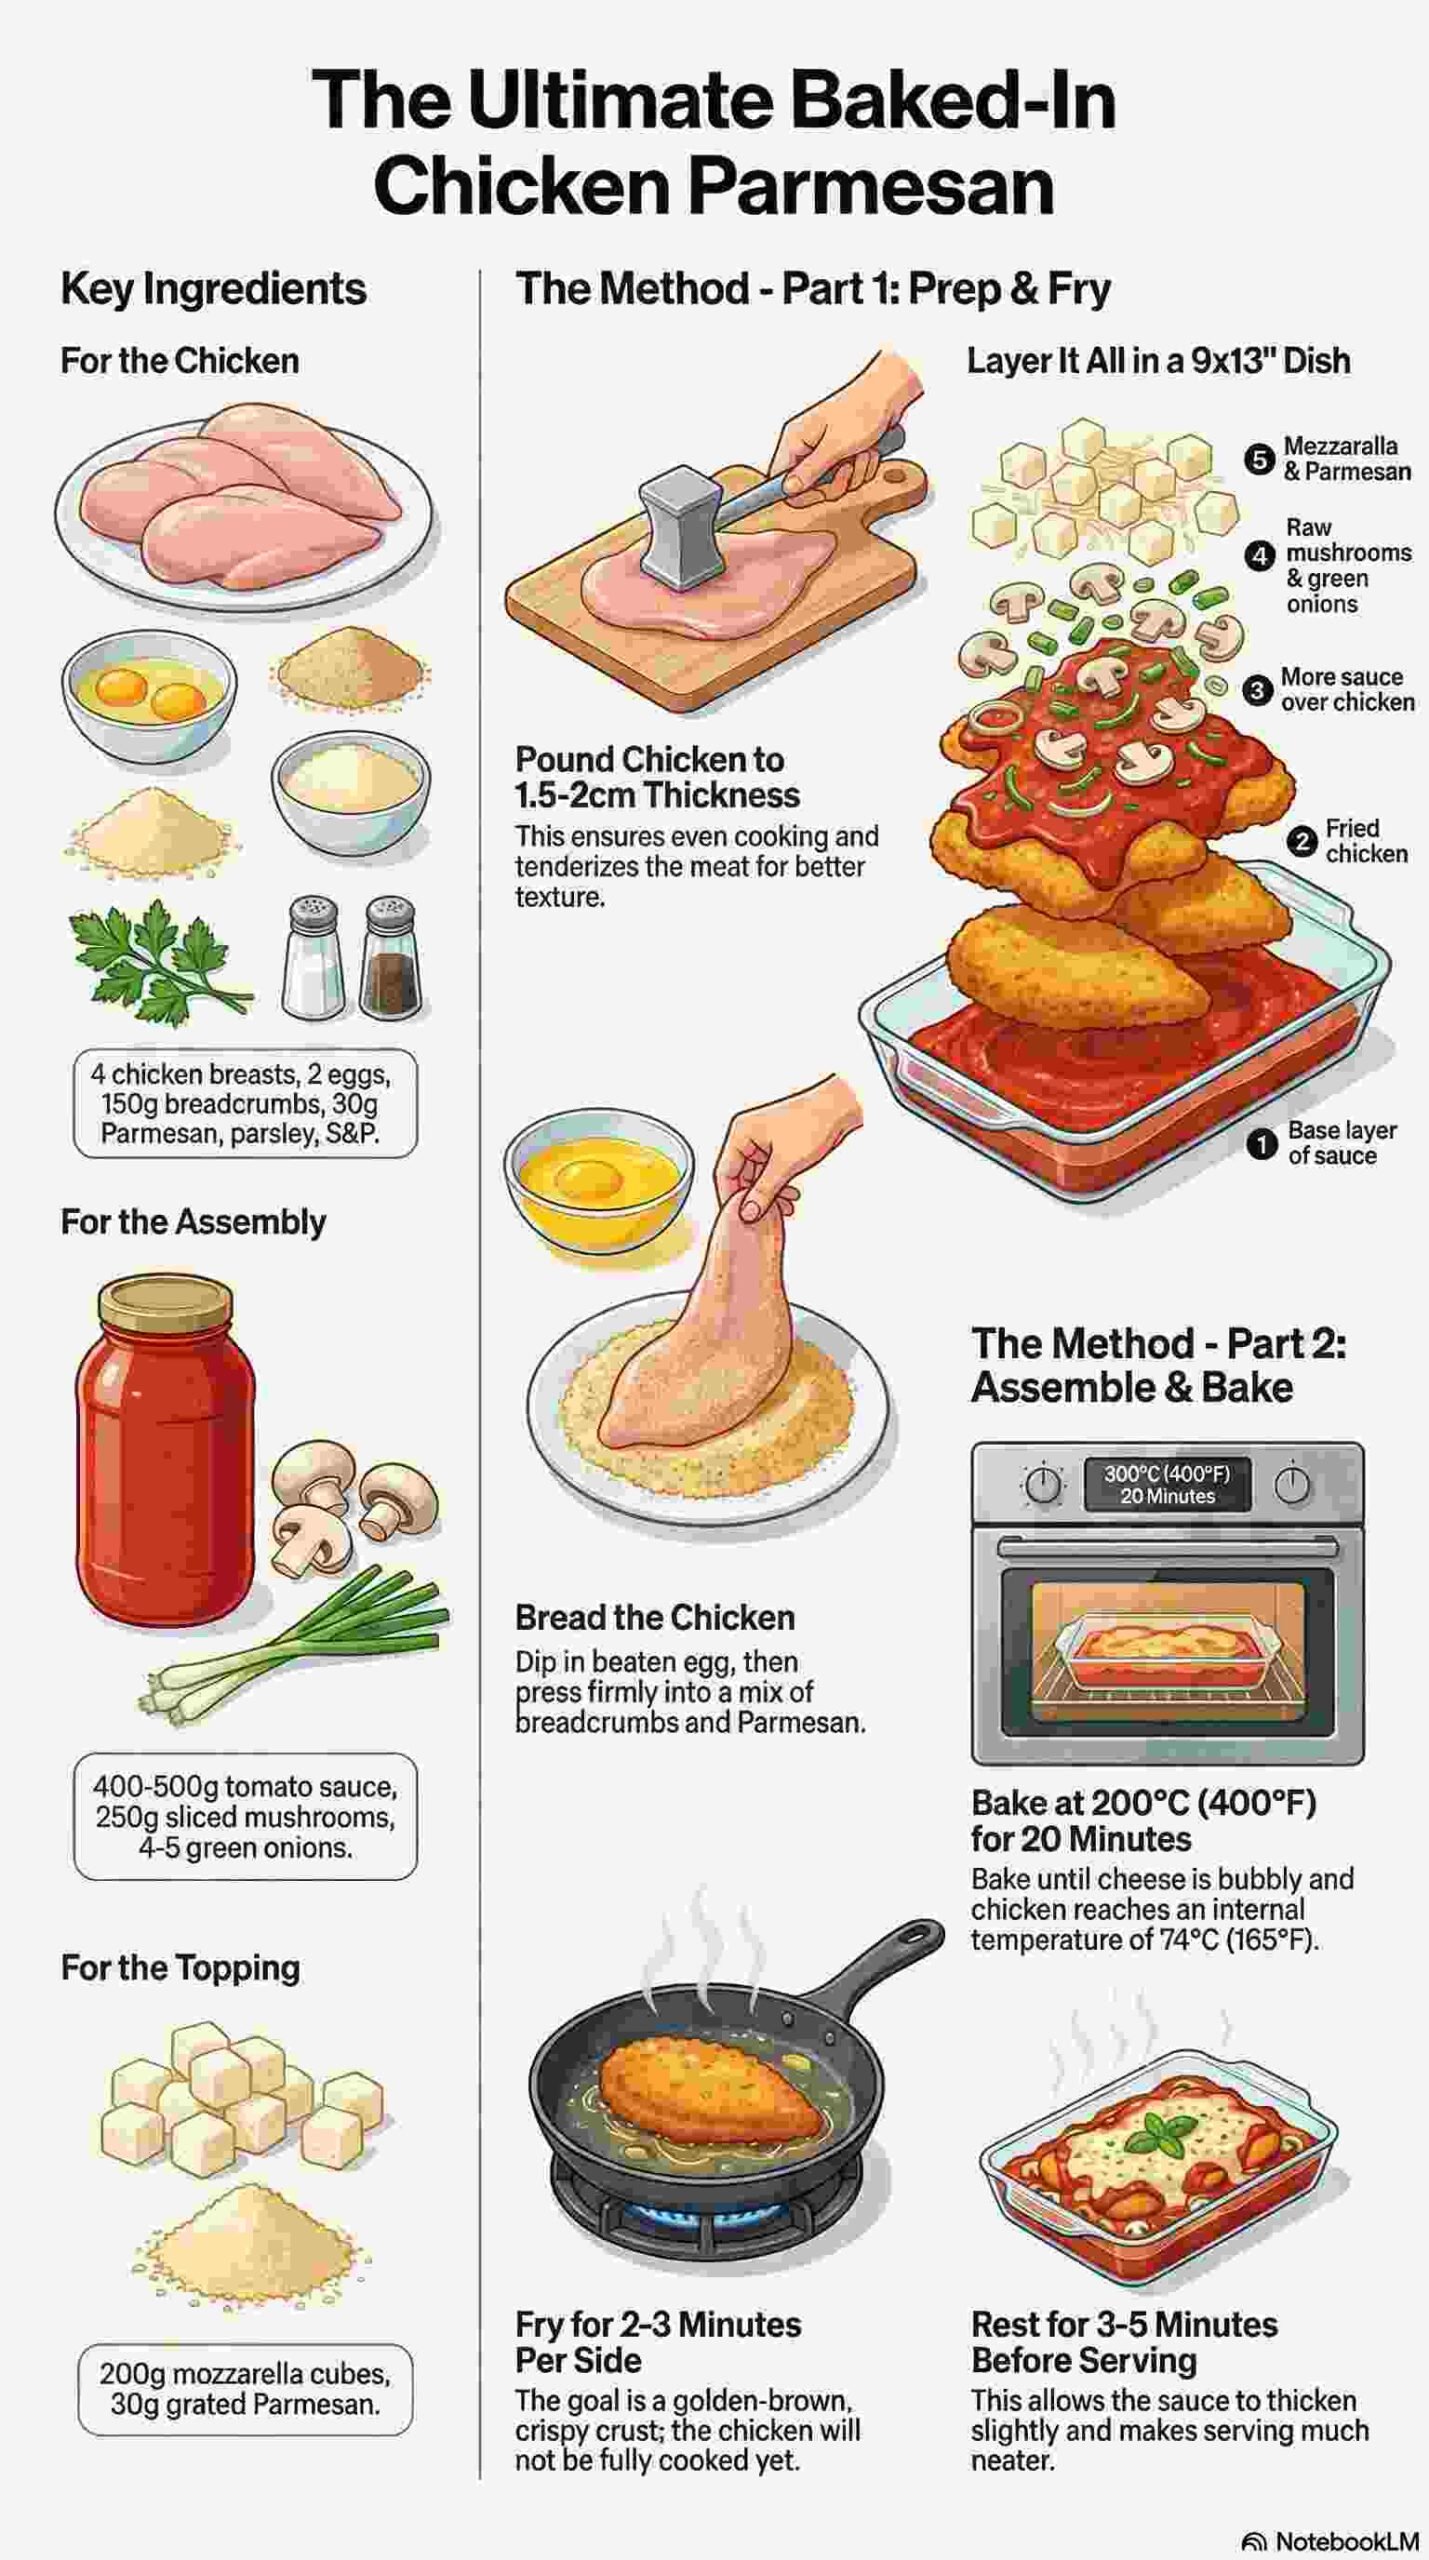
For the Chicken- 4 boneless, skinless chicken breasts (600–700g total)
- Salt and freshly ground black pepper
- 2 large eggs, beaten
- 150g breadcrumbs (plain or Italian-seasoned)
- 50g Parmesan cheese, finely grated (for breading)
- 2 tablespoons fresh parsley, finely chopped
- Olive oil or vegetable oil for pan-frying
- 400–500g tomato sauce (homemade or quality jarred marinara)
- 250g mushrooms, sliced
- 4–5 green onions, sliced
- 200g mozzarella cheese, cut into small cubes
- 30g Parmesan cheese, grated (for topping)
- Pinch of salt for mushrooms (optional)
Ingredient Selection and Preparation
Chicken Breast Considerations
Uniform thickness ensures even cooking throughout the baking process. Chicken breasts often have thick and thin sections, creating uneven cooking where thin portions dry out before thick sections reach safe internal temperature. Pound chicken breasts to an even 1.5-2cm thickness using a meat mallet between sheets of plastic wrap or parchment paper. This technique also tenderizes the meat by breaking down muscle fibers.
According to USDA food safety guidelines, chicken must reach an internal temperature of 74°C (165°F) to eliminate harmful bacteria including Salmonella and Campylobacter. Using a meat thermometer to verify doneness prevents both undercooking and the dry, overcooked texture that results from excessive baking time.
Breadcrumb Selection
Plain dried breadcrumbs provide a neutral base that crisps well and accepts seasonings evenly. Italian-seasoned breadcrumbs contain dried herbs (oregano, basil) and garlic powder, offering convenience but less control over final seasoning. Panko breadcrumbs create an exceptionally crispy coating due to their larger, airier structure, though they produce a different texture than traditional chicken Parmesan.
Creating homemade breadcrumbs from day-old bread provides superior flavor and texture. Process dried bread in a food processor until fine, then toast briefly in a dry pan or low oven (150°C/300°F) for 5-7 minutes until lightly golden and completely dry. Homemade breadcrumbs contain no preservatives or anti-caking agents, resulting in better adhesion and browning.
Tomato Sauce Quality
The sauce forms the flavor foundation of this dish, making quality essential. San Marzano tomatoes, grown in volcanic soil near Mount Vesuvius, Italy, offer sweet flavor with low acidity and minimal seeds. Quality jarred marinara should list tomatoes as the first ingredient, followed by olive oil, garlic, and herbs, with minimal added sugar or preservatives.
For homemade sauce, simmer crushed tomatoes with olive oil, garlic, fresh basil, and a pinch of salt for 20-30 minutes until slightly thickened. Adding a small amount of sugar (1/2 teaspoon per 500g tomatoes) balances acidity without creating sweetness. The sauce should coat a spoon but remain pourable, not thick like paste.
Mushroom Varieties
Common button mushrooms work perfectly in this preparation, offering mild flavor that complements rather than competes with the tomato and cheese. Cremini mushrooms (baby bella) provide deeper, earthier flavor with similar texture. Shiitake mushrooms add more pronounced umami character, though their firmer texture requires slightly longer cooking.
Slice mushrooms 4-5mm thick for optimal cooking. Thinner slices may become too soft and disappear into the sauce, while thicker slices may remain undercooked during the 20-minute bake time. According to research from the USDA Agricultural Research Service, mushrooms contain powerful antioxidants and provide significant amounts of selenium, potassium, and B vitamins, making them a nutritious addition beyond their flavor contribution.
Mozzarella Considerations
Fresh mozzarella packed in water contains 50-60% moisture, which releases during baking and can create excess liquid. Low-moisture mozzarella, sold in blocks or pre-shredded, contains 45-52% moisture and melts into stretchy, cohesive layers without releasing excessive liquid. For this baked preparation, low-moisture mozzarella cubes provide ideal melting properties.
Cut mozzarella into 1-1.5cm cubes rather than shredding. Cubes create pockets of melted cheese throughout the dish rather than a uniform blanket, providing textural variety and ensuring every bite contains melted cheese.
Method
Prep & Bread Chicken
1. Prepare the chicken: Pat chicken breasts completely dry with paper towels. Moisture prevents breading from adhering properly, causing it to slide off during cooking. If needed, pound to even 1.5-2cm thickness. Season both sides generously with salt and freshly ground black pepper. The breading adds flavor, but seasoning the meat directly ensures the chicken itself tastes well-seasoned.
2. Set up breading station: Arrange two shallow dishes or wide bowls. In the first dish, beat 2 eggs until the whites and yolks combine completely. In the second dish, combine breadcrumbs, 50g grated Parmesan, and chopped fresh parsley, mixing thoroughly to distribute ingredients evenly. The Parmesan adds savory depth and helps the breadcrumbs brown beautifully, while parsley provides color and fresh flavor.
3. Bread the chicken: Working with one piece at a time, dip the seasoned chicken into beaten egg, turning to coat both sides completely. Allow excess egg to drip back into the dish. Transfer immediately to the breadcrumb mixture, pressing gently to ensure breadcrumbs adhere to all surfaces. Turn and press the second side. The goal is complete, even coverage with no bare spots where the chicken shows through. Place breaded chicken on a clean plate and repeat with remaining pieces.
4. Pan-fry until golden: Heat 3-4mm of oil in a large skillet over medium-high heat. The oil should shimmer but not smoke, approximately 175-180°C (350°F) if using a thermometer. Carefully add breaded chicken pieces, working in batches if necessary to avoid overcrowding. Overcrowding lowers oil temperature, causing soggy rather than crispy breading.
Fry 2-3 minutes per side until the breading turns deep golden brown and sets firmly. The chicken will NOT be fully cooked at this stage; it finishes cooking in the oven. This initial frying creates the characteristic crispy crust while providing enough structure that the breading won’t become soggy during baking. Transfer to a paper towel-lined plate and set aside.
Assemble (Everything Goes In Raw)
1. Preheat the oven: Set oven to 200°C (400°F) and position a rack in the center. This temperature provides enough heat to cook the chicken through, soften the mushrooms, and melt the cheese without burning the top before the interior finishes cooking.
2. Prepare the baking dish: Select a baking dish large enough to hold all four chicken pieces in a single layer with minimal overlap, typically a 23x33cm (9×13 inch) rectangular dish or similar size. Spread a thin layer of tomato sauce across the bottom, approximately 100-125ml (about 1/2 cup). This sauce layer prevents the chicken from sticking and contributes moisture to the overall dish.
3. Add the chicken: Arrange the partially cooked, breaded chicken cutlets in the baking dish in a single layer. They can touch but shouldn’t significantly overlap, as overlapping creates uneven cooking and prevents the breading from maintaining its texture.
4. Add sauce: Spoon additional tomato sauce over each chicken piece, using approximately 300-350ml total. The sauce should cover most of the breading while leaving some edges exposed. Completely submerging the chicken creates sogginess, while too little sauce allows the breading to dry out and potentially burn.
5. Add raw vegetables: Scatter the sliced mushrooms evenly over and around the chicken pieces. Distribute sliced green onions over the top as well. If desired, sprinkle a small pinch of salt over the mushrooms, which helps draw out their moisture and concentrates their flavor during baking. The vegetables cook from raw state during the oven time, releasing juices that enhance the sauce.
6. Add cheese: Distribute the mozzarella cubes evenly over the chicken and vegetables. Don’t place all the cheese in one area; scatter it throughout so every portion gets melted cheese. The cubes will melt and spread during baking, creating pockets of gooey cheese throughout the dish.
7. Final cheese topping: Sprinkle the additional 30g of grated Parmesan evenly over everything. This creates a golden, slightly crispy top layer and adds sharp, salty flavor that balances the mild mozzarella.
Bake
1. Bake uncovered: Place the assembled dish in the preheated oven and bake for approximately 20 minutes. The exact time depends on the chicken’s thickness and your oven’s accuracy. The dish is ready when:
- The chicken reaches an internal temperature of 74°C (165°F) when measured with an instant-read thermometer inserted into the thickest part
- The mushrooms have softened completely and released their juices
- The cheese has melted completely and bubbles actively around the edges
- The sauce simmers visibly around the chicken pieces
2. Check for doneness: After 18 minutes, check the chicken’s internal temperature. If it hasn’t reached 74°C, continue baking and check every 2-3 minutes. Avoid overbaking, which dries out the chicken even in this moist environment.
3. Optional broiling: For a more deeply browned, crispy cheese top, switch the oven to broil (high) for the final 1-2 minutes. Watch constantly, as the cheese can go from perfectly browned to burnt very quickly under the broiler. This step is optional but creates appealing visual contrast and adds caramelized cheese flavor.
4. Rest before serving: Remove from the oven and let rest 3-5 minutes. This brief resting period allows the sauce to thicken slightly and makes serving neater, as the cheese sets enough to avoid running everywhere when plated.
Technical Notes on the Baked-In Method
The success of this technique relies on calculating cooking times so all components finish simultaneously. Chicken breast requires approximately 15-18 minutes at 200°C to cook from its partially-fried state to safe internal temperature. Mushrooms need 12-15 minutes to soften and release moisture. Cheese melts in 8-10 minutes. The 20-minute total baking time accommodates all these requirements with a small buffer.
The protective layer of sauce and cheese over the breaded chicken creates a microenvironment that traps steam, keeping the chicken moist while preventing the breading from becoming completely soggy. The portions of breading exposed to direct heat crisp further, creating textural contrast between the saucy, cheese-covered sections and the crispier edges.
Mushroom placement matters more than it might seem. Mushrooms placed directly on top of chicken pieces release their moisture onto the breading, which can create soft spots. Distributing some mushrooms around the chicken rather than exclusively on top allows their juices to flow into the sauce, contributing flavor without compromising breading texture.
Serving and Presentation
Serve directly from the baking dish or carefully transfer portions to individual plates using a wide spatula. The dish pairs naturally with pasta—spaghetti, linguine, or penne—dressed simply with additional tomato sauce or olive oil and garlic. Alternatively, serve with crusty bread for soaking up the sauce, a green salad with vinaigrette to balance the richness, or roasted vegetables like zucchini, bell peppers, or broccoli.
Garnish with fresh basil leaves torn by hand, additional grated Parmesan, or a drizzle of high-quality extra virgin olive oil for added richness and visual appeal.
Variations and Adaptations
Protein substitutions: This method works equally well with turkey cutlets, pork cutlets (pounded thin), or even thick white fish fillets like cod or halibut, though fish requires reduced baking time (12-15 minutes typically).
Vegetable variations: Replace or supplement mushrooms and green onions with:
- Sliced bell peppers (any color) for sweetness and color
- Zucchini coins or half-moons for summery freshness
- Spinach or kale (add raw; it wilts during baking)
- Sliced cherry tomatoes for bursts of acidity
- Artichoke hearts (quartered) for Mediterranean character
Sauce modifications: Enhance the tomato sauce with:
- Fresh garlic cloves, sliced thin and scattered with the vegetables
- Red pepper flakes for heat
- Fresh basil leaves tucked between chicken pieces
- A splash of red wine added to the sauce before assembling
- Capers and olives for briny complexity
Cheese alternatives: Experiment with:
- Provolone instead of or combined with mozzarella for sharper flavor
- Fontina for nutty, buttery notes
- Asiago for pronounced tanginess
- A combination of multiple Italian cheeses
Gluten-free adaptation: Use gluten-free breadcrumbs or substitute with finely ground almonds, crushed gluten-free crackers, or gluten-free panko for the breading.
Make-ahead preparation: Bread the chicken up to 4 hours ahead and refrigerate, covered. The breading sets more firmly when chilled, often resulting in better adhesion during frying. The entire assembled dish can be prepared up to 2 hours in advance and refrigerated, then brought to room temperature for 20 minutes before baking. Add 5-7 minutes to the baking time if assembling ahead and refrigerating.
Storage and Reheating
Leftovers keep refrigerated for 3-4 days in an airtight container. The breading softens during storage as it continues absorbing moisture from the sauce, but the dish remains flavorful.
Reheat in a 180°C (350°F) oven for 12-15 minutes until heated through, covering with foil to prevent excessive browning. Microwave reheating works but creates uneven heating and further softens the breading. For best results with leftover portions, consider refreshing in a skillet over medium heat with a splash of water or additional sauce, which creates steam to heat through while the bottom regains some crispness.
This baked-in chicken Parmesan method demonstrates how strategic assembly and timing can simplify complex dishes without sacrificing quality. By understanding how different components cook at various rates and manipulating their placement and protection within the dish, home cooks can create layered, flavorful meals with minimal active cooking time and maximum reward.