There’s something deeply satisfying about a well-made cutlet sandwich. Crispy, golden breading meets tender meat, melted cheese, bright tomato sauce, and savory sautéed vegetables, all stacked into one hearty bite. This Italian-style breaded beef cutlet sandwich draws from classic Italian-American cooking, where breaded cutlets are the base for countless comforting meals.
What sets this sandwich apart is the balance of flavors and textures. The beef cutlet gets a Parmesanand parsley infused breadcrumb coating for extra crunch, topped with quick tomato sauce, mushrooms, and peppers for depth. Melted provolone finishes it off, bringing everything together in a sandwich that’s rich, satisfying, and never too heavy. 😋
The Recipe
Ingredients for Italian Breaded Beef Cutlet Sandwiches
Makes 2 sandwiches
- Bread
- 1 large crusty Italian roll or ciabatta, split and lightly toasted
- Beef Cutlets
- 2 thin beef cutlets, pounded evenly
- Salt and black pepper
- Breadcrumbs (as needed)
- 2–3 eggs
- Handful grated Parmesan
- Handful fresh parsley, finely chopped
- Olive oil, for frying
- Tomato Sauce
- 300 ml passata
- 1/2 small onion, finely diced
- 1/2 tsp chili flakes
- 1 bay leaf
- 2 basil leaves
- Olive oil
- Salt, to taste
- Vegetables
- 300 g mushrooms, sliced
- 1 bell pepper, sliced
- Olive oil
- Salt, to taste
- Cheese
- Provolone cheese, sliced (enough to cover the cutlets)
Understanding the Components
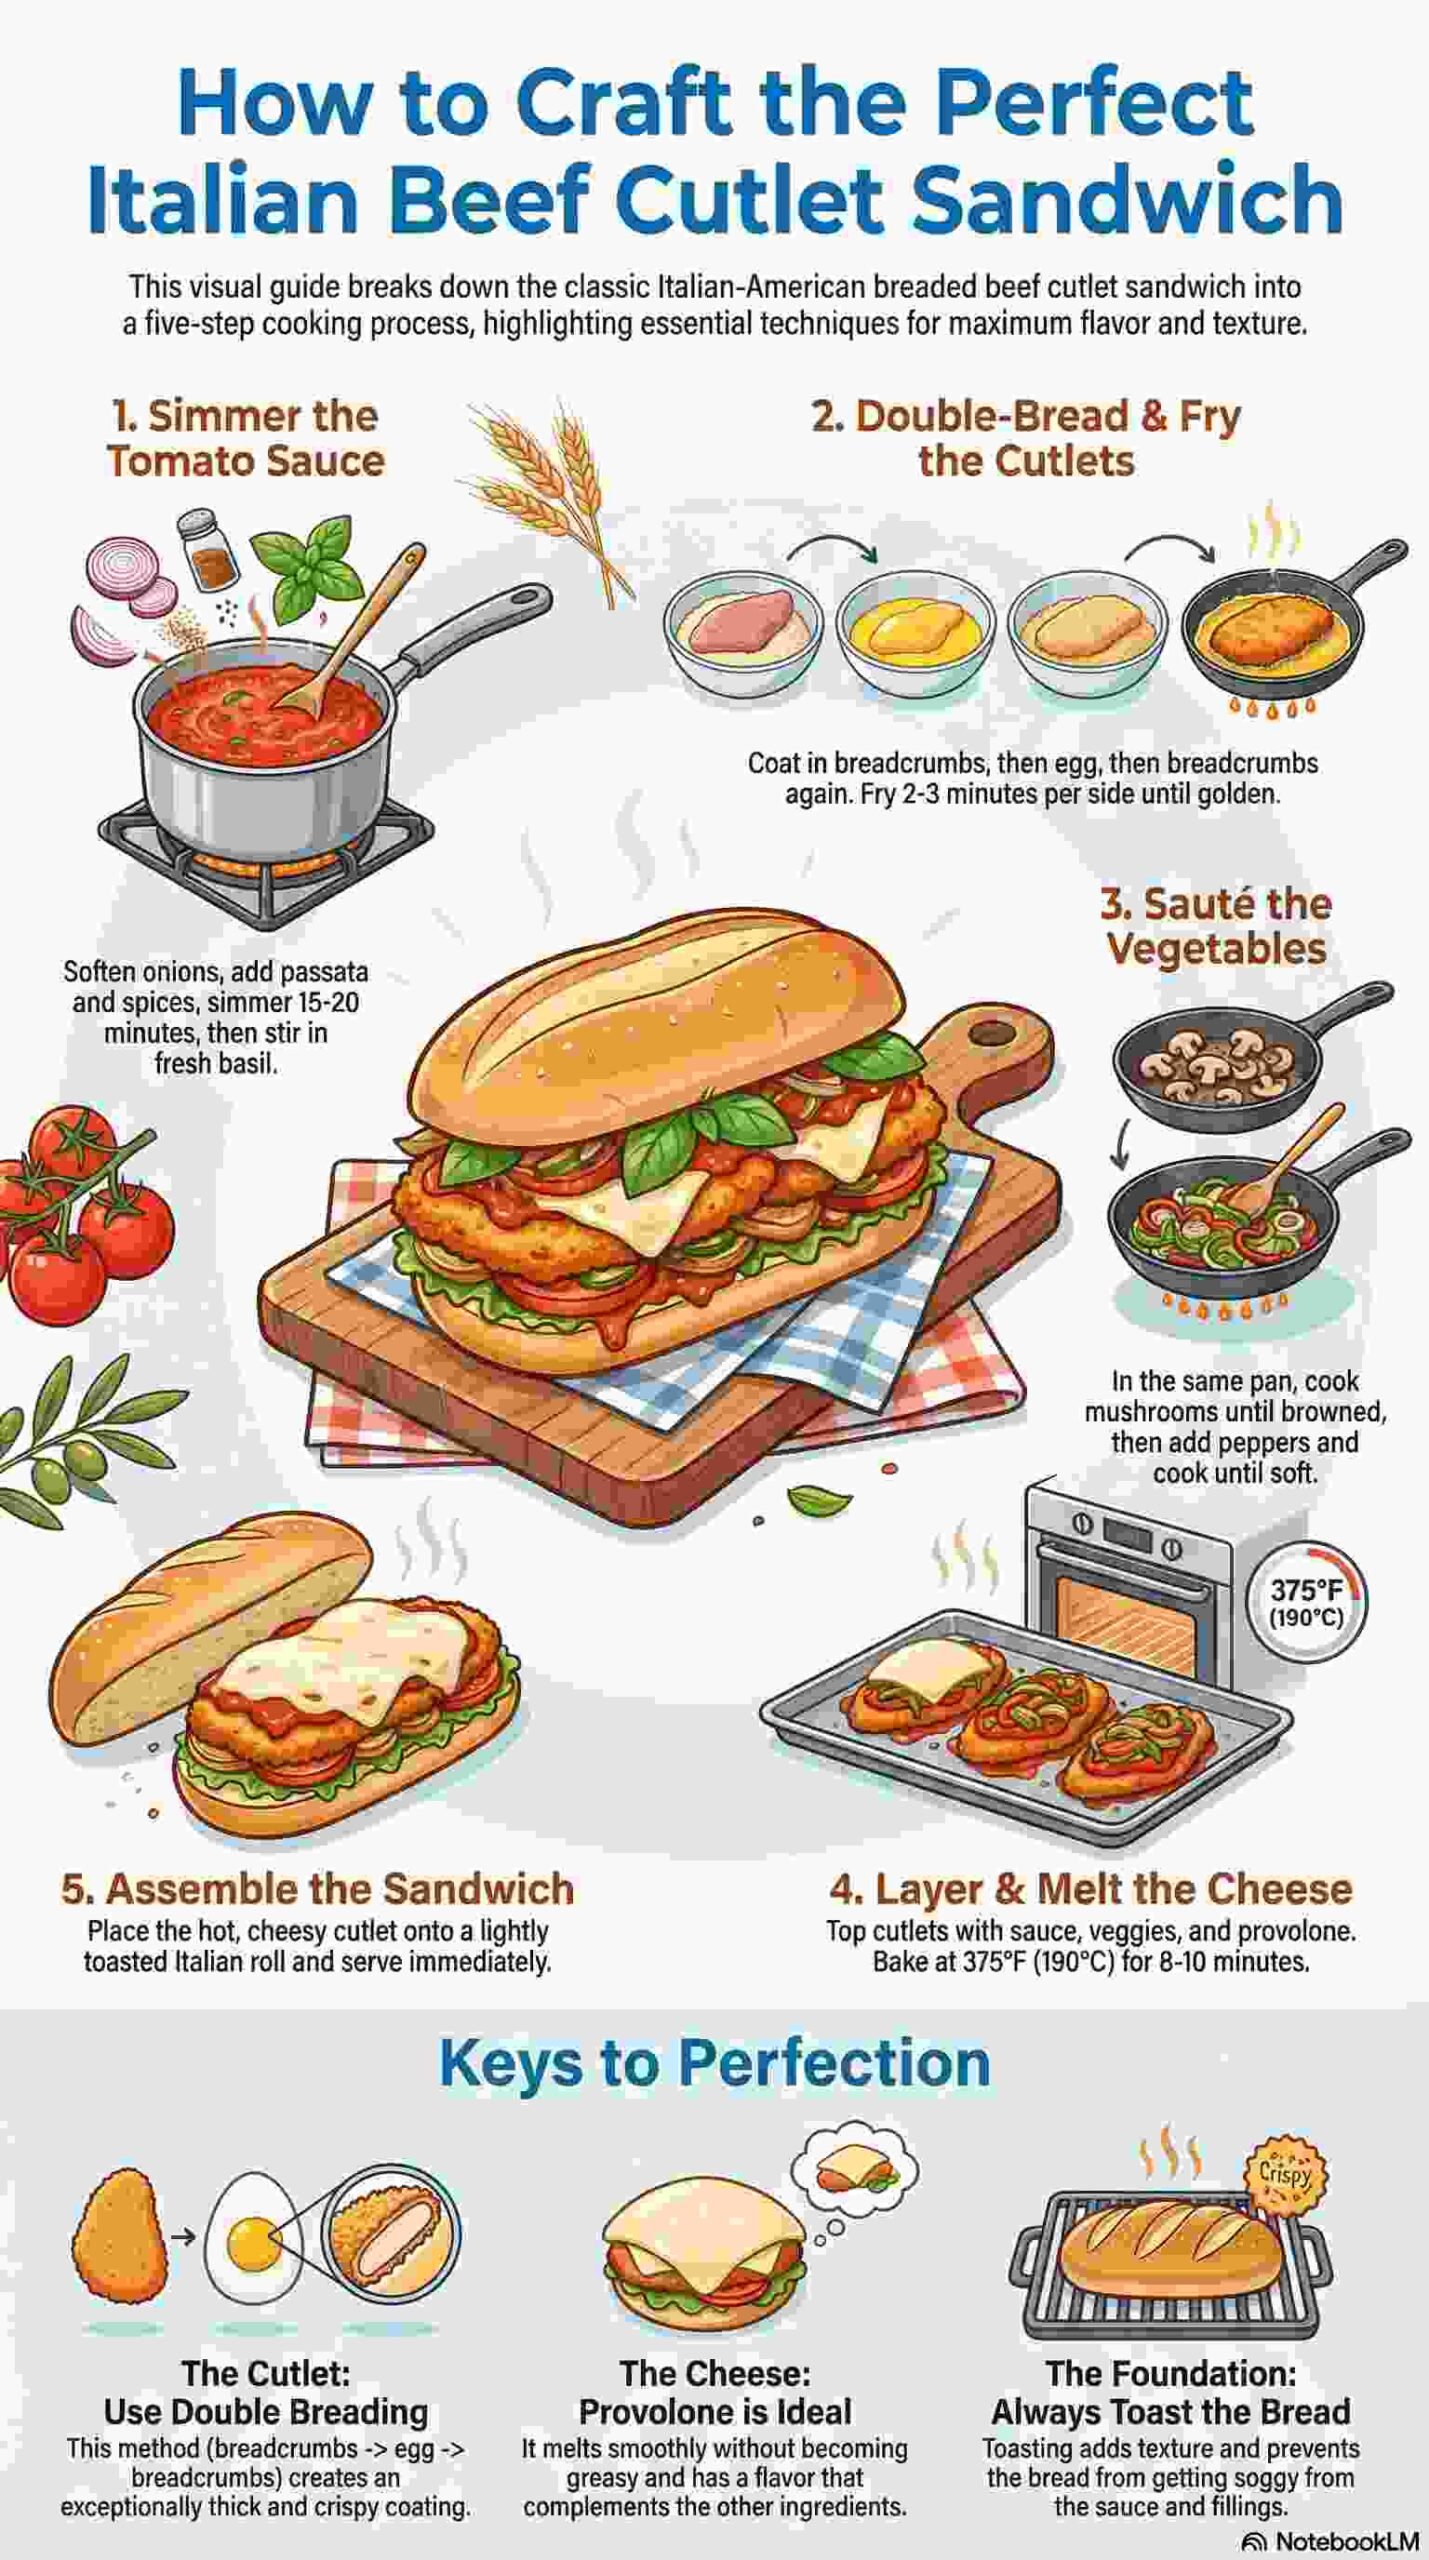
The Cutlet: Double Breading for Maximum Crispiness
The technique used here is double breading, a method that creates an exceptionally thick, crunchy coating. According to Everyday Delicious’s guide to crispy breaded cutlets, double breading means dipping the cutlet in breadcrumbs, then egg mixture, then breadcrumbs again, creating a coating that’s both thicker and significantly crispier than single breading. This technique requires a bit more attention to detail, but the payoff is substantial.
The key to successful breading is having thin, evenly pounded cutlets. Uneven thickness means uneven cooking, with thin parts becoming overcooked and dry while thicker sections remain underdone. Use a meat mallet or even a heavy pan to pound the beef to an even thickness of about 1/4 inch. If you don’t have a mallet, placing the meat between plastic wrap and using a rolling pin works perfectly well.
The egg mixture in this recipe isn’t just eggs. It’s enriched with grated Parmesan and fresh parsley, which add flavor directly into the breading layer rather than just on the surface. This means every bite of the crust delivers not just crunch but actual taste, something that makes a significant difference in the final sandwich.
Building Flavor: The Tomato Sauce
Even though this tomato sauce simmers for just 15 to 20 minutes, it develops remarkable depth through proper technique. Starting with finely diced onions cooked until soft and translucent creates a sweet base. Adding chili flakes early allows their heat to bloom in the oil, distributing evenly throughout the sauce rather than creating harsh hot spots.
The bay leaf contributes a subtle herbal note that rounds out the tomato’s acidity. Fresh basil goes in at the very end to preserve its bright, aromatic quality. If you add basil too early, it loses its freshness and can become bitter during prolonged cooking.
This sauce isn’t meant to be complex or time-consuming. It’s a quick, bright accompaniment that adds moisture and acidity to balance the richness of the fried cutlet and melted cheese. Make it while your cutlets come to room temperature, and it’ll be ready exactly when you need it.
The Vegetables: Mushrooms and Peppers
Mushrooms and peppers might seem like simple additions, but they’re carefully chosen for what they bring to the sandwich. Mushrooms, when cooked properly over high heat, develop a deep brown crust and concentrated umami flavor. They add earthiness that complements the beef without competing with it.
Bell peppers provide sweetness and a slight char when cooked until soft and lightly caramelized. They also add color and a fresh vegetable element that keeps the sandwich from feeling too heavy. Using the same pan that fried the cutlets means the vegetables pick up residual flavors from the breading and oil, creating continuity across all the components.
The Cheese: Why Provolone
Provolone is the ideal cheese for this sandwich. Its semi-firm texture means it melts smoothly without becoming greasy or stringy. The flavor is assertive enough to stand up to the other strong tastes in the sandwich but not so sharp that it dominates. Young provolone is mild and creamy, while aged provolone is sharper and more complex. Either works beautifully here, depending on your preference.
The cheese goes on last, draped over the assembled cutlet, vegetables, and sauce, then briefly baked just until melted. This final step in the oven serves a dual purpose: it melts the cheese thoroughly and allows all the components to meld together slightly, transforming individual elements into a cohesive whole.
Method
Step 1: Make the Tomato Sauce
Start with the sauce since it needs time to simmer. Heat a generous glug of olive oil in a small saucepan over medium heat. Add the finely diced onion and cook, stirring occasionally, until it becomes soft and translucent. This usually takes 5 to 7 minutes. Don’t rush this step. Properly softened onions provide a sweet foundation that raw or undercooked onions simply cannot.
Once the onions are soft, stir in the chili flakes and bay leaf. Let them cook in the oil for about 30 seconds to bloom their flavors. Add the passata and season with salt to taste. Bring the sauce to a gentle simmer, then reduce the heat to low. Let it cook uncovered for 15 to 20 minutes, stirring occasionally. You’re looking for the sauce to thicken slightly and for the raw tomato taste to mellow into something rounder and sweeter.
Just before you’re ready to use the sauce, tear the basil leaves and stir them in. Remove the bay leaf and discard it. The sauce should be thick enough to cling to a spoon but still pourable. If it seems too thick, add a splash of water. If it’s too thin, simmer it for a few more minutes.
Step 2: Bread the Beef
Prepare your breading station before you handle the meat. You’ll need two shallow dishes or plates. In the first, spread out a generous layer of breadcrumbs. In the second, beat the eggs with the grated Parmesan and chopped parsley until well combined. The mixture should be pale yellow flecked with green and white.
Season your beef cutlets lightly with salt and pepper on both sides. Remember that the breadcrumb coating and Parmesan will add salt, so don’t overseason the meat itself.
Now for the double breading technique. Take one cutlet and press it firmly into the breadcrumbs, making sure it’s evenly coated on both sides. Shake off any excess. Dip the breaded cutlet into the egg mixture, turning it to coat completely. Let any excess egg drip off, then press it back into the breadcrumbs a second time. Press gently to ensure the breadcrumbs adhere well to the egg coating. The cutlet should look substantially thicker now, with a robust coating that will fry up beautifully crisp.
Repeat with the second cutlet. Let the breaded cutlets rest on a plate for 5 to 10 minutes if you have time. This brief rest allows the breading to set and helps it stay attached during frying.
Heat about 1/4 inch of olive oil in a large skillet over medium-high heat. Test the oil temperature by dropping in a pinch of breadcrumbs. If they sizzle immediately and turn golden within about 30 seconds, the oil is ready. If they burn quickly, reduce the heat. If they sit without much sizzling, increase the heat.
Carefully place the breaded cutlets in the hot oil. Don’t move them around. Let them fry undisturbed for 2 to 3 minutes until the bottom is deeply golden brown and crisp. Flip them carefully using a spatula or tongs and fry the other side for another 2 to 3 minutes until equally golden and crisp.
The cutlets should be cooked through at this point since they’re thin. If you’re unsure, you can check the internal temperature, which should reach 145°F for beef. Transfer the fried cutlets to a plate lined with paper towels to drain briefly. Don’t stack them or they’ll steam and lose their crispiness.
Step 3: Cook the Mushrooms and Peppers
Use the same pan you fried the cutlets in, which will have flavorful brown bits and some residual oil. If there’s too much oil, pour some off, but leave a couple tablespoons. If there’s not enough, add a bit more olive oil.
Heat the pan over medium-high heat. Add the sliced mushrooms in a single layer if possible. Don’t stir them immediately. Let them sit undisturbed for 2 to 3 minutes to develop a golden-brown crust on one side. Then stir and cook for another 2 to 3 minutes until they’re browned all over and have released and then reabsorbed their moisture. Season with salt.
Add the sliced bell pepper to the mushrooms. Continue cooking, stirring occasionally, until the peppers are soft and lightly caramelized around the edges. This takes about 5 to 7 minutes. The peppers should be tender but still have some structure. Season with additional salt if needed.
Remove the vegetables from the heat and set them aside.
Step 4: Melt the Cheese
Preheat your oven to 190°C (375°F).
Place the fried cutlets on a baking tray or in an oven-safe dish. Spoon a thin layer of your tomato sauce over each cutlet. You don’t need to cover them completely, just add enough to provide moisture and flavor. Think of it as a flavorful base for the toppings rather than the main event.
Divide the cooked mushrooms and peppers between the two cutlets, spreading them evenly over the sauce. Lay slices of provolone over everything, covering the vegetables and cutlet completely. Depending on the size of your provolone slices, you might need 2 to 3 slices per cutlet.
Place the tray in the preheated oven and bake for 8 to 10 minutes. You’re looking for the cheese to melt completely and become lightly bubbly around the edges. The cutlets themselves are already cooked, so you’re just heating everything through and melting the cheese. Don’t leave them in too long or the breading will lose its crispiness.
Step 5: Assemble the Sandwich
While the cutlets are in the oven, prepare your bread. Cut the Italian roll or ciabatta open and lightly toast it if you haven’t already. A quick toast under the broiler or in a toaster oven helps the bread hold up to the juicy cutlet and prevents it from getting soggy.
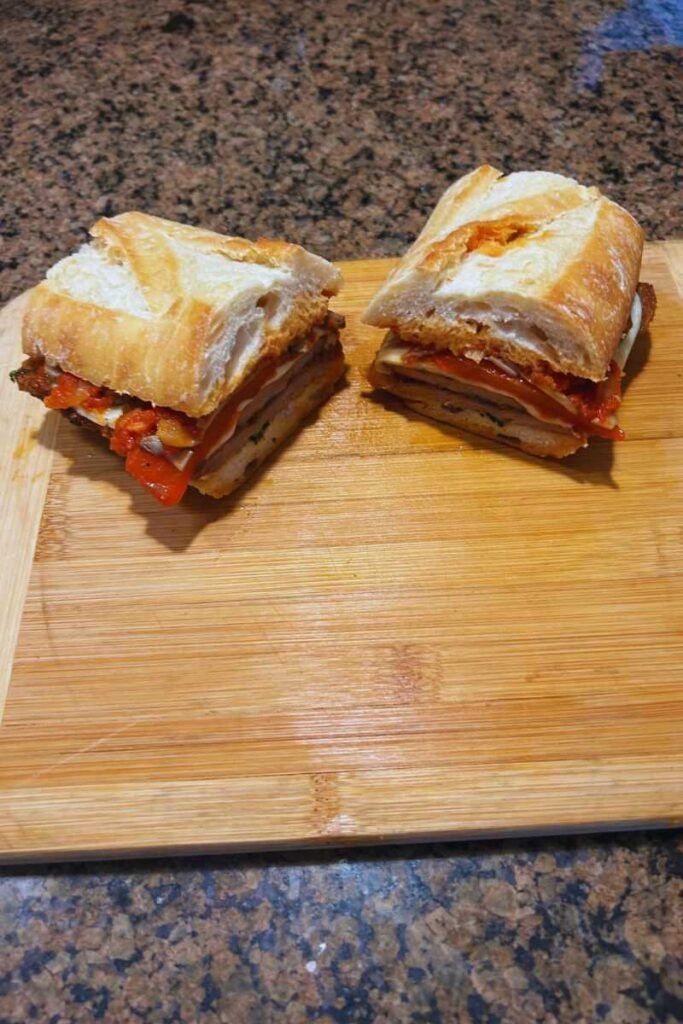
Remove the cutlets from the oven. Using a spatula, carefully transfer each cheesy cutlet into the toasted bread. If you’d like extra sauce, spoon a little more over the top of the cutlet before closing the sandwich.
Press down gently on the sandwich to compress it slightly, but not so hard that you squeeze out all the fillings. Cut each sandwich in half on a diagonal for easier handling.
The History of Italian-American Sandwiches
This style of hot sandwich has deep roots in Italian-American communities, particularly in the northeastern United States. According to Wikipedia’s comprehensive history of submarine sandwiches, Italian immigrants began making these substantial sandwiches on long rolls in the late 19th and early 20th centuries. The term hoagie, commonly used in Philadelphia, likely originated from Italian workers at the Hog Island shipyard who brought these sandwiches for lunch.
The sandwich evolved from simple combinations of Italian cold cuts and cheese to include hot components like breaded cutlets, meatballs, and sausages. These hot variations became staples at Italian delis and pizzerias throughout the region, each establishment developing its own variations and specialties.
What makes these sandwiches distinctly Italian-American rather than Italian is their scale and abundance. In Italy, a sandwich might be modest and focused. In America, Italian immigrants had access to meat and cheese in quantities they couldn’t afford in the old country, and their sandwiches reflected this newfound abundance. The generous portions and multiple components layered into one sandwich became a celebration of prosperity and plenty.
Serving Suggestions
This sandwich is substantial enough to be a complete meal on its own. The combination of protein, vegetables, and bread provides satisfying balance without needing much else. However, a few accompaniments can enhance the experience.
A simple green salad dressed with red wine vinegar and olive oil provides refreshing contrast to the richness of the sandwich. The acidity of the dressing cuts through the cheese and fried coating, cleansing the palate between bites.
Pickled vegetables like giardiniera (Italian pickled vegetable mix) or pepperoncini offer bright, acidic crunch that complements the sandwich beautifully. Many Italian delis serve these alongside sandwiches for exactly this reason.
If you want something more substantial, crispy oven-baked potato wedges or a simple pasta salad work well. Keep side dishes simple so they don’t compete with the complex flavors of the main attraction.
Variations and Adaptations
Chicken or pork cutlets: The exact same technique works beautifully with chicken breast or pork loin cutlets. Pound them thin and follow the recipe as written. Chicken cutlets are traditional in Italian-American cooking and create a slightly lighter sandwich.
Different cheeses: While provolone is classic, fresh mozzarella creates a creamier, milder sandwich. Sharp aged provolone adds more tangy intensity. Fontina melts beautifully and has a nutty richness. Experiment to find your preference.
Add greens: A handful of arugula or spinach added to the sandwich just before serving provides peppery freshness and balances the richness.
Spicier version: Add sliced hot cherry peppers or jalapeños along with the bell peppers, or use a spicier tomato sauce with more chili flakes.
Eggplant instead of beef: Follow the same breading and frying technique with thick slices of eggplant for a vegetarian version. The double breading works perfectly with eggplant’s texture.
Storage and Reheating
This sandwich is best enjoyed immediately after assembly when the cutlet is still crispy and the cheese is freshly melted. However, you can prepare components ahead of time for easier assembly later.
The breaded cutlets can be fried up to 2 hours ahead and kept at room temperature. Reheat them in a 375°F oven for 5 to 7 minutes to restore crispiness before assembling the sandwiches.
The tomato sauce keeps well in the refrigerator for up to 5 days. Make a larger batch and use it for pasta or other sandwiches throughout the week.
The mushrooms and peppers can be sautéed a day ahead and refrigerated. Reheat them gently before assembling the sandwiches.
Fully assembled sandwiches don’t store well, as the bread becomes soggy and the cutlet loses its crisp coating. If you have leftovers, store the components separately and reassemble fresh sandwiches when you’re ready to eat.
Tips for Success
Even pounding is crucial. Take your time getting the cutlets to uniform thickness. This ensures even cooking and prevents thin edges from overcooking while thick portions remain underdone.
Don’t skip the resting period after breading. Even 5 to 10 minutes makes a difference in how well the coating adheres during frying.
Maintain oil temperature. If the oil is too cool, the cutlets will absorb oil and become greasy. If it’s too hot, the coating will burn before the meat cooks through. Aim for around 350°F, where the coating sizzles vigorously but doesn’t smoke.
Press the breadcrumbs gently during the double-breading process. This helps create a thick, even coating that won’t fall off during frying.
Use a wire rack instead of paper towels if you have one available. According to It Is A Keeper’s guide to crispy breaded cutlets, draining fried cutlets on a wire rack keeps them crispier than paper towels, which can trap steam and make the coating soggy.
Toast your bread. This simple step prevents sogginess and adds another layer of texture to the sandwich.
Don’t overbake when melting the cheese. Eight to ten minutes is enough. Any longer and you risk the breading losing its crispness.
Season throughout. Season the meat before breading, season the vegetables as they cook, and taste your sauce for proper seasoning. Proper seasoning at each stage builds flavor more effectively than trying to adjust everything at the end.
This Italian breaded beef cutlet sandwich represents the best of Italian-American cooking: taking simple, quality ingredients and treating them with care and proper technique to create something greater than the sum of its parts. The crispy cutlet, bright sauce, savory vegetables, and melted cheese come together in a sandwich that’s satisfying, flavorful, and memorable. Whether you’re making it for a casual lunch or a satisfying dinner, this sandwich delivers every time.