Let me tell you something about mussels linguine: it’s one of those dishes that tastes like you spent hours slaving away in a fancy Italian kitchen, but actually takes about 30 minutes start to finish. I’m talking restaurant-quality seafood pasta that’ll make your dinner guests think you’ve got secret culinary training.
The best part? Mussels are ridiculously cheap compared to other seafood. You can make this impressive dish for a fraction of what you’d pay for shrimp or scallops. And once you nail the technique, you’ll be making this on repeat because it’s that good.
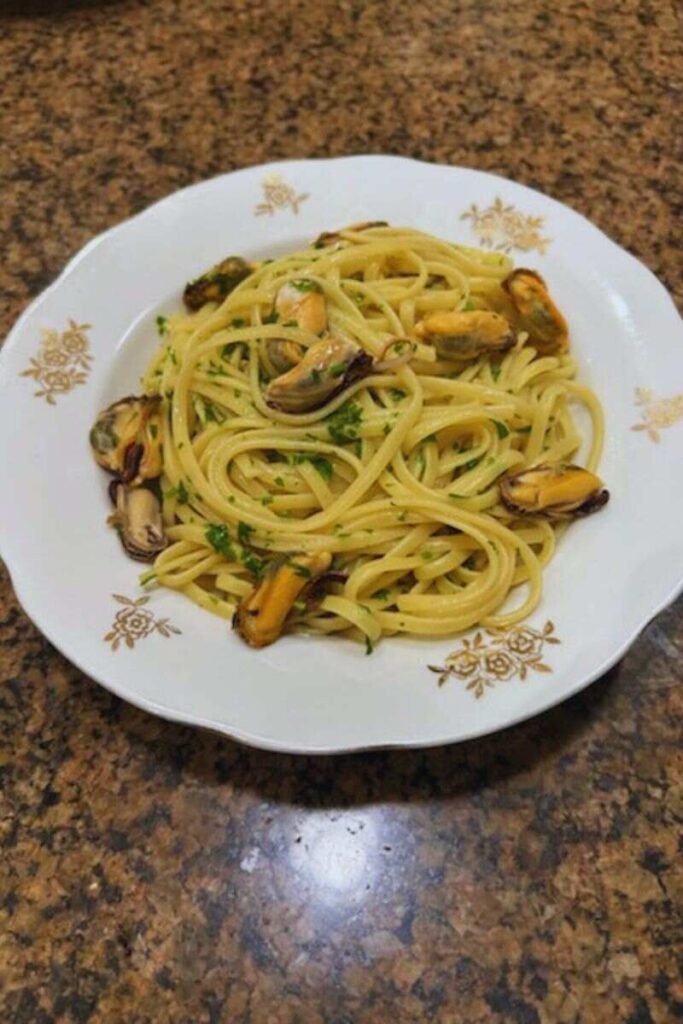
This version removes the shells before serving, which I personally prefer. Nobody wants to wrestle with mussel shells while twirling pasta, and you end up with a much cleaner, more elegant presentation. Plus, every single bite has mussels in it instead of just being decorative shells taking up space on your plate.
Ingredients You’ll Need
Ingredients for Mussels Linguine Pasta
- 500g mussels, cleaned and debearded
- 250-300g linguine
- 1 shallot, finely diced
- 3 garlic cloves, crushed
- ½ chili pepper, finely chopped
- ½ lemon (juice + optional zest)
- ½ handful parsley, finely chopped, plus stems
- 200ml white wine
- 1 tbsp butter
- Extra-virgin olive oil
- Pasta water (reserve some before draining)
- Salt & pepper, to taste
This is a pretty straightforward ingredient list, but a few things are worth discussing.
500g mussels, cleaned and debearded: Fresh mussels are ideal, but frozen work too if that’s what you’ve got. Look for mussels that smell like the ocean, not like low tide at a polluted beach. Fresh mussels should be tightly closed or close up when you tap them. Any that stay open are dead and need to go straight in the trash.
250-300g linguine: Use good quality pasta here. You don’t need fancy imported stuff, but avoid the super cheap brands that turn to mush. Linguine is traditional because its flat shape catches the sauce beautifully, but spaghetti or bucatini work too.
1 shallot, finely diced: Shallots are milder and sweeter than onions, perfect for delicate seafood dishes. If you can’t find shallots, use half a small yellow onion instead.
3 garlic cloves, crushed: Fresh garlic only. That jarred minced stuff tastes weird and has no place in this dish. Crush the cloves with the flat side of your knife before roughly chopping them.
½ chilli pepper, finely chopped: Adjust this to your spice tolerance. I use half a red Thai chilli for a gentle kick, but you could use a whole one if you like heat or swap for red pepper flakes.
½ lemon (juice + optional zest): The acidity cuts through the richness and brightens everything. Use a real lemon, not that plastic squeeze bottle nonsense.
½ handful parsley, finely chopped, plus stems: Italian flat-leaf parsley is better than curly parsley, which tastes like grass. Don’t throw away those stems—they’ve got tons of flavor and go into the sauce.
200ml white wine: Use something dry that you’d actually drink. Sauvignon Blanc, Pinot Grigio, or Vermentino all work great. “Cooking wine” from the grocery store is garbage and will ruin your sauce.
1 tbsp butter: This emulsifies the sauce and adds richness. Don’t skip it.
Extra-virgin olive oil: For sautéing the aromatics. Use decent quality olive oil—it matters.
Pasta water: The starchy liquid gold that brings everything together. Always reserve some before draining pasta.
Salt & pepper: Season to taste at the end.
Before You Start: What You Need to Know
Mussels linguine is fast cooking, which means you need everything prepped and ready before you start. This isn’t a dish where you can pause halfway through to chop something you forgot.
Get your mise en place ready. That’s chef-speak for having everything chopped, measured, and within arm’s reach. Dice your shallot, crush your garlic, chop your chilli and parsley, and have your wine measured out before you start cooking.
Timing is everything. You’ll be cooking the pasta and mussels simultaneously, so read through the entire recipe first. The mussels cook in literally 3-5 minutes, and you don’t want your pasta sitting around getting cold while you figure out the next step.
Don’t overcook mussels. Overcooked mussels turn into rubber erasers. They’re done the second they open up. Any mussels that don’t open after 5-6 minutes are dead and should be thrown out.
Step-by-Step Instructions (The Real Deal)
Alright, let’s make some seriously good mussels linguine.
Step 1: Prep Your Mussels
First things first—you need to clean and debeard your mussels. If you bought them from a good fishmonger, they might already be cleaned, but check anyway.
Rinse the mussels under cold running water, scrubbing off any barnacles or dirt with a stiff brush. Look for the “beard”—that hairy bit sticking out where the shell closes. Grab it firmly and pull it toward the hinge of the mussel to remove it. Some mussels won’t have beards, and that’s fine.
Give each mussel a quick inspection. Discard any with cracked shells or any that are wide open and don’t close when you tap them. Those are dead and will make you sick. According to food safety experts at the FDA, proper selection and handling of shellfish is crucial to prevent foodborne illness.
Step 2: Start the Pasta
Fill a large pot with water, salt it generously (it should taste like the sea), and bring it to a rolling boil. Add your linguine and cook according to package directions, but aim for 1-2 minutes less than the suggested time. You want it al dente since it’ll finish cooking in the sauce.
Set a timer so you don’t forget about it while dealing with the mussels. Before draining, scoop out at least a cup of pasta water and set it aside. You’ll need this liquid gold later.
Step 3: Sauté the Aromatics
While the pasta cooks, heat a couple tablespoons of extra-virgin olive oil in a large, deep pan over medium heat. It needs to be big enough to hold all the mussels and pasta eventually, so use your biggest skillet or a wide pot.
Add your diced shallot and cook for 2-3 minutes until it softens and turns translucent. Don’t let it brown—you’re just trying to take the edge off.
Add the crushed garlic and chopped chilli. Sauté for about 30 seconds, just until fragrant. Garlic burns fast, so don’t walk away. Toss in those parsley stems too—they add subtle flavor to the sauce.
Step 4: Steam the Mussels
Add all your cleaned mussels to the pan and give them a good toss to coat them in the oil and aromatics. They’ll start opening almost immediately.
Pour in the 200ml of white wine. Crank the heat to high, cover the pan with a lid, and let those mussels steam. This takes 3-5 minutes max. You’ll hear them popping open if you listen closely.
After about 3 minutes, lift the lid and check. Most should be open by now. Give the pan a shake to redistribute any stubborn ones, cover again for another minute if needed.
Step 5: Shell the Mussels
Once all (or almost all) mussels have opened, turn off the heat. Using tongs or a slotted spoon, remove each mussel from its shell and place the meat in a bowl. This is a bit tedious, but it’s worth it for that cleaner final dish.
Discard any mussels that stubbornly refused to open—they were dead before cooking and aren’t safe to eat. Also toss the shells in the trash or compost.
Step 6: Strain the Cooking Liquid
Here’s where people often mess up. That liquid in your pan is packed with flavor, but it’s also got sand and grit from the mussels. You need to strain it.
Grab a fine-mesh strainer or line a regular strainer with cheesecloth or a coffee filter. Pour the cooking liquid through it into a clean bowl, leaving behind any sediment at the bottom of the pan. Wipe out the pan quickly if there’s grit, then pour the strained liquid back in.
This step is crucial. Nobody wants to bite down on sand in their beautiful pasta. It ruins the whole experience.
Step 7: Build the Sauce
Put your pan with the strained mussel broth back on medium heat. Add 1 tablespoon of butter, a good squeeze of lemon juice (about half a lemon), and if you want, a bit of lemon zest for extra brightness.
Let this reduce slightly for 2-3 minutes. You want the sauce to concentrate and the butter to emulsify into the liquid, creating a silky, glossy consistency. The butter is what gives the sauce that restaurant-quality richness. Professional chefs use this technique to create emulsified sauces that coat pasta perfectly.
Step 8: Add the Pasta
By now your linguine should be done. Using tongs or a spider strainer, transfer the pasta directly from its cooking pot into the sauce. Don’t drain it in a colander—you want some of that pasta water clinging to the noodles.
Add a splash (maybe ¼ cup) of the reserved pasta water to the pan. Toss everything together vigorously over medium heat for 1-2 minutes. The starch from the pasta water combines with the butter and mussel broth to create a sauce that actually clings to the noodles instead of pooling at the bottom of the bowl.
The pasta should look glossy and slightly creamy, not dry or swimming in liquid. If it’s too thick, add more pasta water. Too loose? Let it cook for another minute to reduce.
Step 9: Add the Mussels Back
Toss your shelled mussels back into the pasta. Gently fold them in—you don’t want to break them apart. They just need to warm through for 30 seconds, no longer. Remember, they’re already cooked, and overcooking makes them tough and rubbery.
Step 10: Finish and Serve
Turn off the heat and add your finely chopped fresh parsley. Toss everything one more time. Taste the sauce and adjust with more lemon juice, salt, or freshly cracked black pepper as needed.
The mussels are naturally salty, and you salted your pasta water, so go easy on additional salt. Start with a small pinch and work your way up.
Plate immediately while everything is hot. Twirl the pasta into shallow bowls, making sure each serving gets plenty of mussels. A final drizzle of good olive oil and maybe a pinch more parsley on top looks professional and tastes great.

Common Mistakes and How to Avoid Them
I’ve made all these mistakes so you don’t have to. Learn from my failures.
Don’t skip straining the cooking liquid. I know it seems fussy, but one mouthful of sandy pasta will haunt you. Just strain it. Takes 30 seconds.
Don’t overcook the mussels. They go from perfect to rubber in like 60 seconds. As soon as they open, they’re done. Continuing to cook them is pointless and destructive.
Don’t drown the pasta. This isn’t soup. You want just enough sauce to coat the noodles, not a bowl full of liquid with some pasta floating in it. If you added too much pasta water, let it reduce more.
Don’t add the mussels too early. They go in at the very end, just to warm through. If you add them earlier, they’ll overcook while the pasta finishes.
Don’t forget to taste and adjust. Every batch of mussels has different salinity levels. Taste your sauce before serving and adjust the seasoning. This is the difference between good pasta and great pasta.
Tips for Restaurant-Quality Results
Want to elevate this dish even further? Here’s the insider knowledge.
Use fresh mussels whenever possible. Frozen work in a pinch, but fresh mussels have better texture and sweeter flavor. Buy them the day you plan to cook them.
Toast the pasta briefly in the sauce. After adding the linguine to the pan, let it cook in the sauce for a full 2 minutes, tossing constantly. This allows the pasta to absorb flavor and the sauce to thicken perfectly.
Add a small knob of butter at the very end. Right before serving, drop in another teaspoon of cold butter and swirl the pan. This creates an extra glossy, restaurant-style finish.
Serve in warmed bowls. Run your serving bowls under hot water, dry them, then plate. Warm bowls keep the pasta hot longer.
Have everything ready before you start. I can’t stress this enough. Once you start cooking, everything moves fast. Prep all ingredients first.
Use the freshest parsley you can find. Wilted, sad parsley doesn’t cut it. Fresh, bright green parsley adds both flavor and visual appeal.
Frequently Asked Questions
Can I use frozen mussels?
Yes, but thaw them completely first and pat them dry. Frozen mussels release more liquid, so you might need less pasta water when finishing the sauce.
What if I can’t find linguine?
Spaghetti, bucatini, or even fettuccine work fine. Just stick with long pasta—short pasta doesn’t work as well with mussels.
Can I make this without wine?
You could substitute with seafood stock or chicken stock with a splash of lemon juice, but honestly, the wine really makes this dish. It’s worth buying a cheap bottle just for cooking.
How do I know if mussels are fresh?
They should smell like clean ocean water, not fishy or ammonia-like. They should be tightly closed or close when tapped. Heavy mussels are full of meat; light ones might be mostly sand or dead.
Can I add other seafood?
Absolutely. Clams work great and cook in about the same time. Shrimp can be added in the last minute. Just don’t overload the dish or it becomes a chaotic seafood stew instead of focused mussels linguine.
Why is my sauce watery?
You either added too much pasta water or didn’t let the sauce reduce enough. Put it back on the heat and let it cook down for another minute or two, tossing constantly.
Can I prep anything ahead?
You can clean and debeard the mussels a few hours ahead and keep them refrigerated. You can also chop all your aromatics. But the actual cooking must be done right before serving—this dish doesn’t reheat well.
Conclusion: Time to Impress Everyone
Mussels linguine is one of those magical recipes that delivers massive flavor with minimal effort. Once you’ve made it a couple times and understand the flow, you can knock it out in 30 minutes flat. It’s perfect for a weeknight dinner that feels special or for impressing dinner guests without actually stressing yourself out.
The combination of sweet mussels, garlicky white wine sauce, and perfectly cooked pasta is just… chef’s kiss. And the fact that you shelled the mussels shows you went the extra mile for presentation and ease of eating.
Next time you want to make something that tastes expensive and complicated but isn’t, this is your move. Your dinner guests will be convinced you secretly went to culinary school, when really you just followed directions and had good timing.
Now go buy some mussels and make this happen. Your taste buds will thank you 🙂