I discovered Shepherd peppers at a Turkish market last summer after walking past them for months, thinking they were just another variety of hot pepper. The vendor finally convinced me to try one—sweet, mild, with this perfect thin skin that practically begs to be fire-roasted. That night, I charred a batch over my gas stove, and the smell alone had my neighbor knocking on my door asking what I was cooking.
These fire-roasted peppers are ridiculously simple: six ingredients, maybe 20 minutes total, but they taste like you’ve spent hours on them. The char adds smokiness, the lemon cuts through the richness, and the garlic and parsley bring everything together. This is the kind of dish that makes you look like a much better cook than the effort actually required 😋.
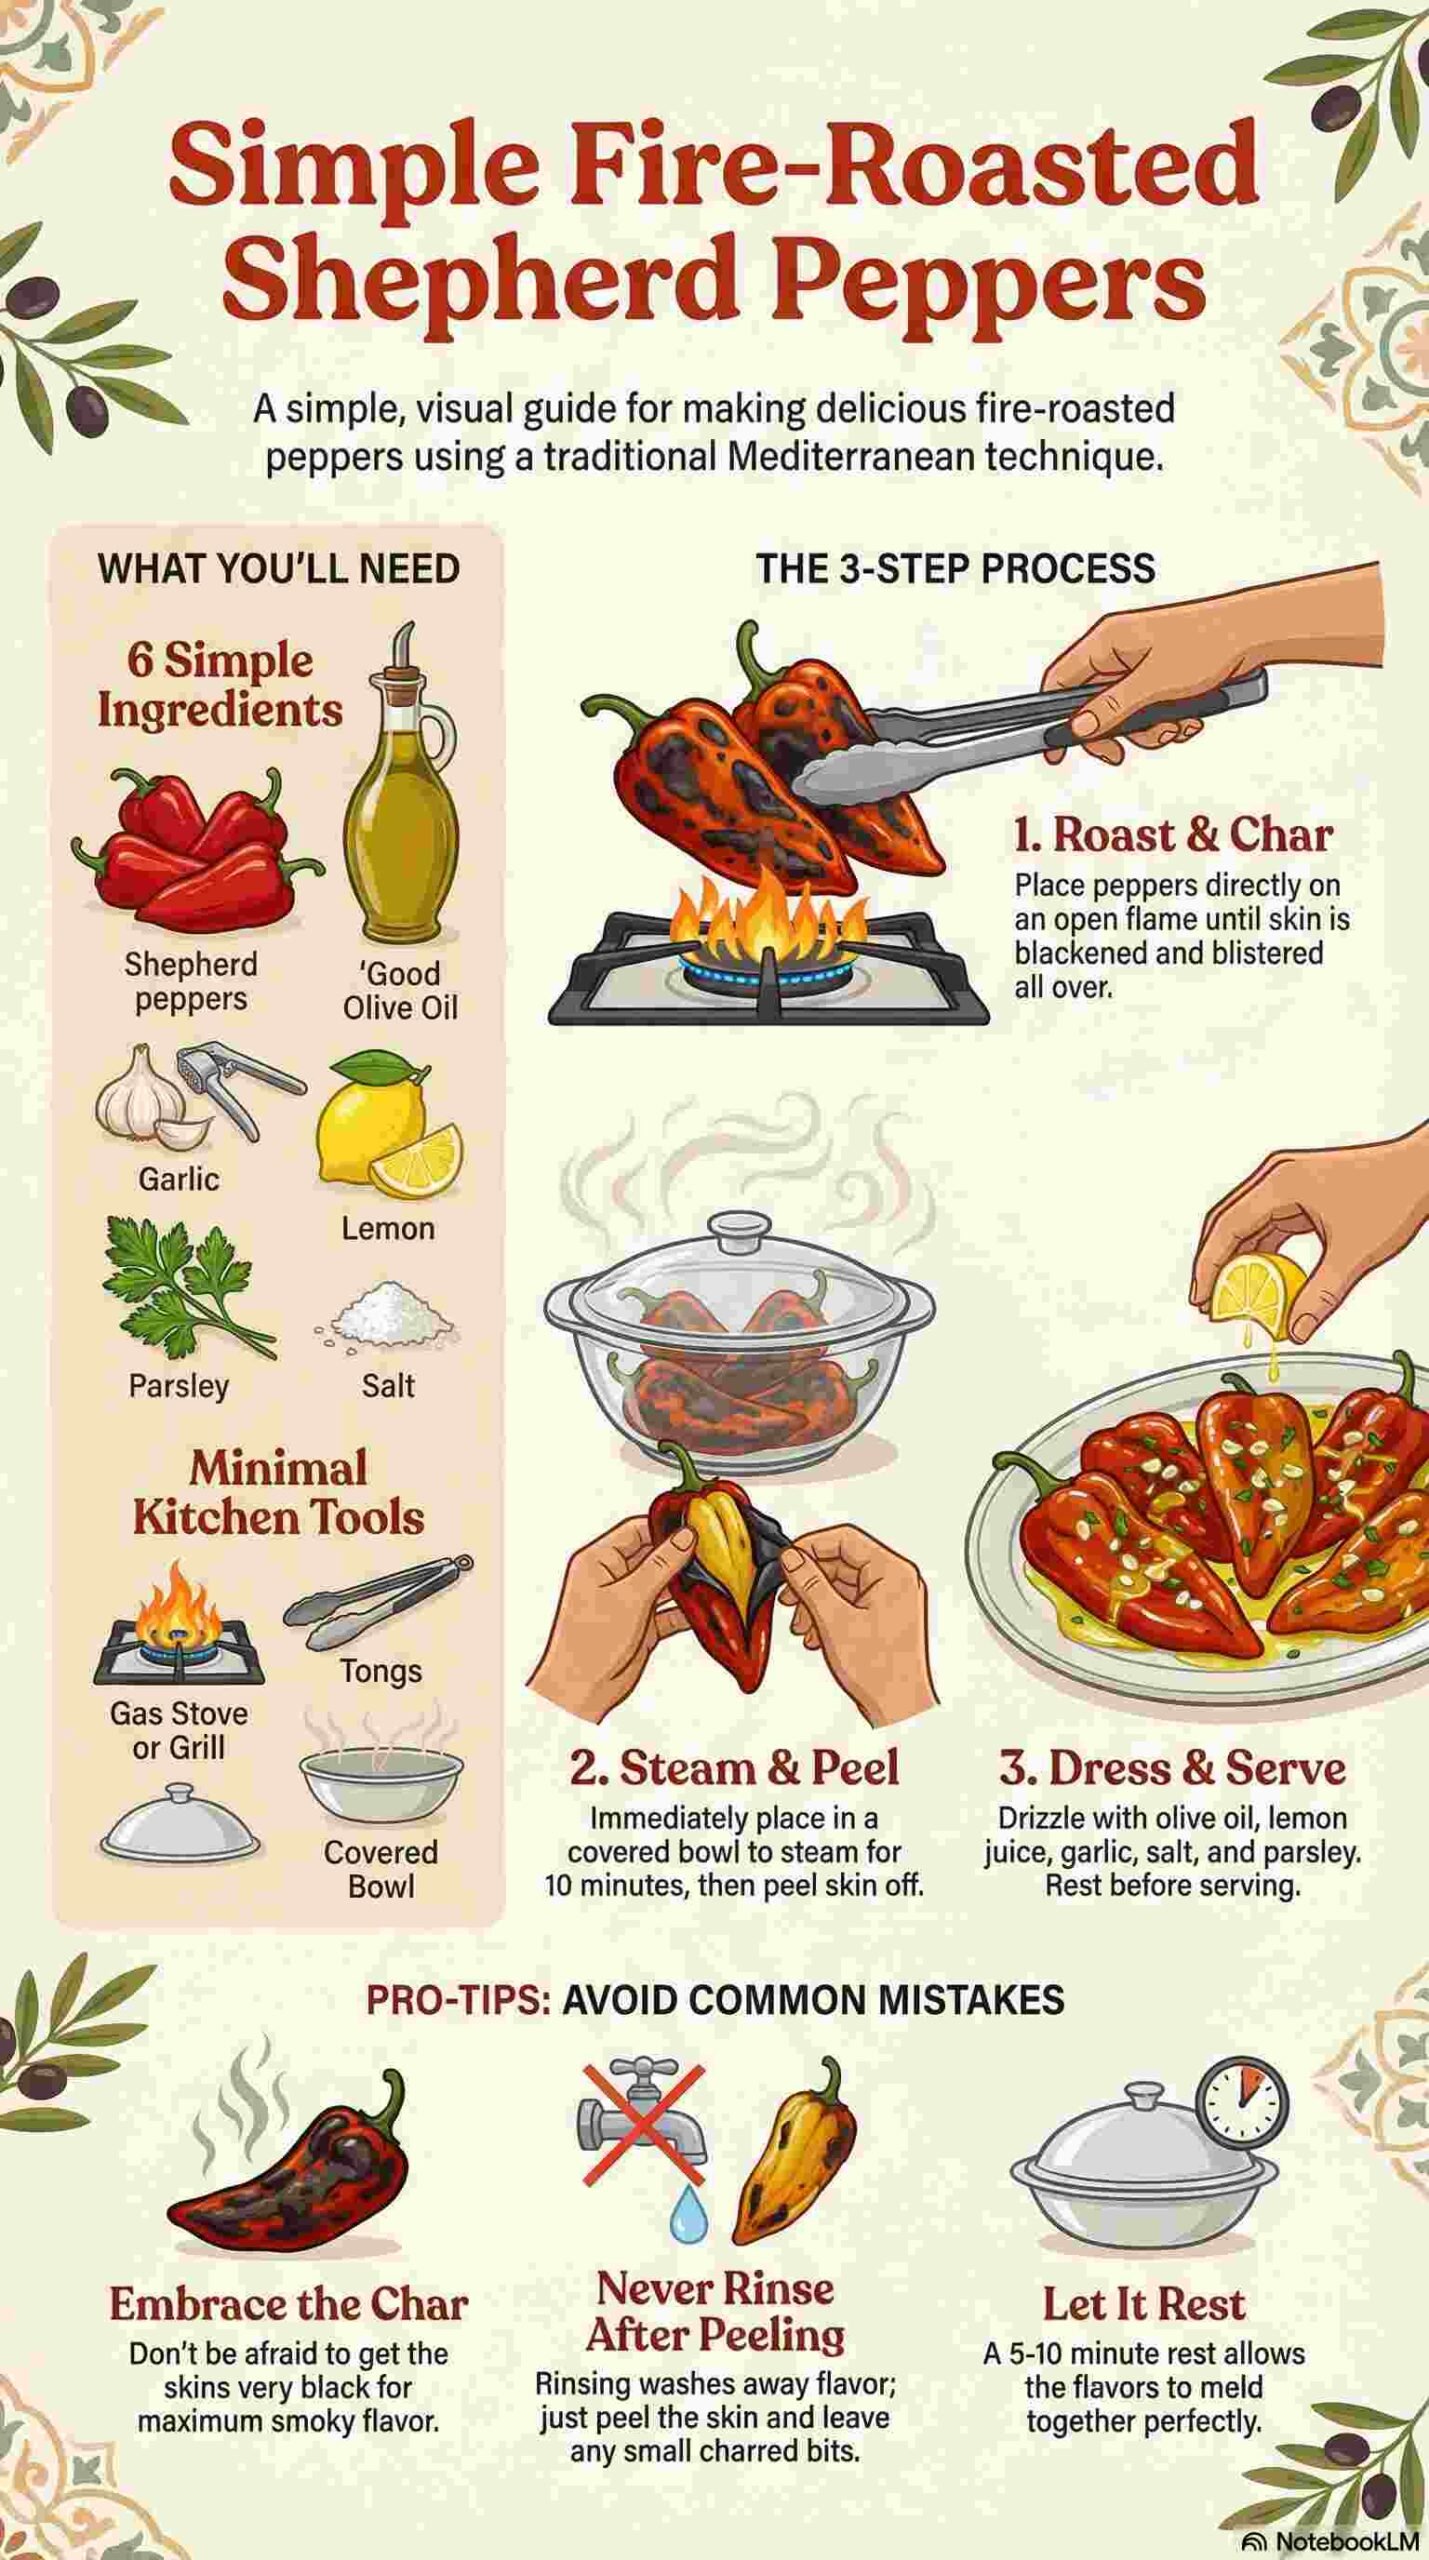
What You’ll Need
Ingredients for Roasted Red Shepherd Peppers
For the peppers:- 12–14 shepherd peppers (also called sivri or Turkish peppers)
- Extra virgin olive oil (use a good one)
- 1 garlic clove, minced
- Salt, to taste
- Juice of ½ lemon
- Large handful of fresh parsley, roughly chopped
Shepherd peppers are long, thin, light green peppers with a mild sweetness and almost no heat. They’re thinner-skinned than bell peppers and char beautifully. They’re commonly used in Mediterranean cooking and are prized for roasting.
If you can’t find shepherd peppers, Italian frying peppers or Anaheim peppers work as substitutes. The flavor won’t be identical, but they’ll still roast well.
Shepherd peppers are long, thin, light green peppers with a sweet, mild flavor and almost no heat. They’re completely different from bell peppers, thinner skinned, more delicate, and they char beautifully.
Shepherd peppers are an elongated sweet pepper variety that’s become increasingly popular in Mediterranean cooking for their juicy flesh and excellent roasting qualities, according to Cooks Info’s Shepherd pepper guide.
If you can’t find Shepherd peppers specifically, look for Italian frying peppers or Anaheim peppers as substitutes. They won’t be exactly the same (Shepherd peppers have a unique sweetness), but they’ll work in a pinch.
Kitchen Tools You’ll Need
A gas stove with open flame (or outdoor grill), tongs for turning peppers, a bowl with a lid (or plate, or paper bag), and a serving plate. That’s literally it. No special equipment, no complicated gadgets. Just fire and peppers.
Step 1: Roast the Peppers (Embrace the Char)
Place the peppers directly over an open gas flame on your stovetop, or on a hot grill if you’re cooking outdoors. Don’t use a pan, you want direct flame contact. Set your burner to medium-high and lay the peppers right on the grate.
Turn them until the skins are blistered and well charred all over. This takes 2-3 minutes per side, maybe 8-10 minutes total per pepper. You’re looking for blackened, blistered skin with some areas completely charred. Don’t be timid here, the more char, the more flavor.
The peppers will hiss, pop, and smell incredible. The skin will bubble up and turn black in spots. This is exactly what you want. Use tongs to rotate them, getting all sides evenly charred. The flesh underneath will soften while the skin blackens.
High‑heat roasting triggers chemical changes that increase volatile compounds associated with roasted, grilled, and sweet aroma in peppers, such as pyrazines and pyrroles, as shown in a study on roasted red pepper seeds.
Pro tip: I usually roast 3-4 peppers at once on different burners. They cook quickly, so you can work in batches and have them all done in 15 minutes.
Step 2: Steam & Peel (The Easy Part)
Transfer the charred peppers to a bowl as soon as they’re done. They’ll be extremely hot, so use tongs and be careful. Cover immediately with a lid, plate, or put them in a paper bag. The steam trapped inside will loosen the skin from the flesh.
Let them steam for 10 minutes. This resting period is crucial, it makes peeling infinitely easier. The steam continues cooking the peppers slightly while loosening that charred skin.
After 10 minutes, gently peel off the burnt skin. It should come away easily in large pieces. Don’t stress about getting every tiny bit, a few small charred spots left on add character and flavor. Just remove the majority of the blackened skin.
Remove seeds if desired. Shepherd peppers have minimal seeds compared to bell peppers, and they’re not spicy, so I usually leave most of them. If you prefer seedless, cut a slit down one side and scrape them out gently. Don’t rinse the peppers under water, you’ll wash away flavor.
Step 3: Season (Simple but Important)
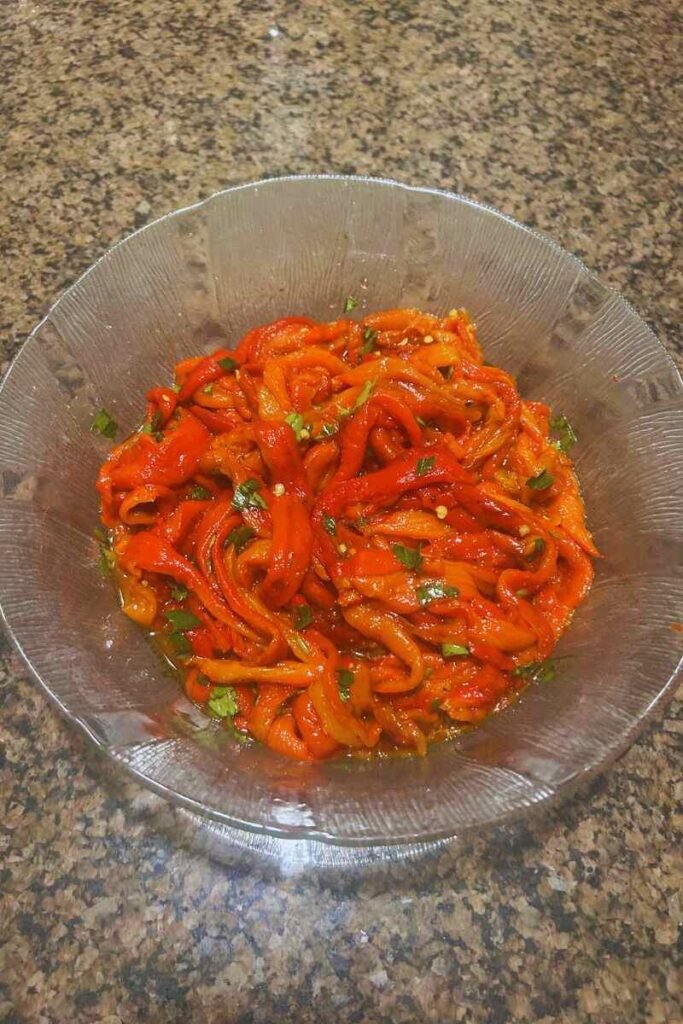
Arrange the peeled peppers on a serving plate. They’ll be soft and floppy now, so just lay them out in a single layer or slightly overlapping. Drizzle generously with extra virgin olive oil, we’re talking 3-4 tablespoons minimum. The peppers will absorb the oil, and it carries all the other flavors.
Sprinkle with salt. Don’t be shy. The peppers are naturally sweet and need salt to balance them. I use about ½ teaspoon of flaky sea salt, but taste and adjust.
Add the minced garlic evenly over the peppers. Raw garlic adds a sharp, pungent bite that mellows slightly as it sits. If raw garlic isn’t your thing, you can sauté it briefly in a little olive oil first, but I prefer the punch of raw garlic here.
Step 4: Finish (The Bright Notes)
Squeeze the juice of half a lemon over the peppers. The acidity cuts through the oil and sweetness, brightening everything up. Fresh lemon juice is non-negotiable, bottled stuff doesn’t have the same punch or aroma.
Scatter the roughly chopped parsley on top. Don’t mince it fine, rough chop is the way to go. You want visible green flecks that add fresh, herbaceous notes. I use about ½ cup loosely packed parsley, but more is always welcome.
Step 5: Rest & Serve (Patience Pays Off)
Let the dish sit for 5-10 minutes before serving so the flavors meld. The peppers will absorb the olive oil, the garlic will mellow slightly, and everything will come together into a cohesive dish. Room temperature is actually ideal for serving these, they lose some flavor when they’re too hot or too cold.
Serve with crusty bread for soaking up the garlicky lemon oil at the bottom of the plate. That oil is liquid gold, don’t waste it.
Fire-Roasted Shepherd Peppers: Lemon & Parsley Infographic
Here’s a simple visual guide to roasting Shepherd peppers perfectly every time—flavor tips, timing, and key ingredients all in one glance.
Why This Recipe Works
Fire-roasting creates the Maillard reaction, the chemical process that browns food and creates complex flavors. The high heat caramelizes the natural sugars in the peppers while adding smoky char. The thin skin of Shepherd peppers makes them ideal for this because it blisters quickly without overcooking the flesh.
The combination of fat (olive oil), acid (lemon), aromatics (garlic), and herbs (parsley) is a classic Mediterranean flavor profile that enhances rather than masks the sweet pepper flavor. Each component plays a specific role, the oil carries flavors and adds richness, the lemon brightens, the garlic adds depth, and the parsley brings freshness.
Common Mistakes I’ve Made (So You Don’t Have To)
Not charring enough. On my first batch, I got nervous about burning them and pulled them off too early. The result was bland, barely roasted peppers. Char them. Blacken them. Trust the process.
Rinsing the peppers after peeling. I did this once thinking it would clean them up. Instead, I washed away all the flavor and ended up with watery, bland peppers. Don’t rinse. Just peel.
Using cheap olive oil. This is one of those dishes where olive oil quality matters. You’re using it as a main flavor component, not just cooking fat. Splurge on something decent.
Skipping the resting time. I’ve served these immediately after seasoning when I was impatient. They’re okay, but not great. That 5 to 10 minute rest really does make a difference in how the flavors come together.
What to Serve With Fire-Roasted Peppers
These peppers work as an appetizer, a side dish, or part of a mezze spread. I usually serve them with:
Crusty bread or pita for scooping and soaking up the oil. This is essential, you need something to mop up that garlicky lemon oil.
Feta cheese or goat cheese on the side adds creamy, tangy contrast to the sweet peppers. Crumble some over the top or serve it alongside.
Grilled meats like lamb, chicken, or steak pair beautifully. The peppers’ sweetness complements charred meat perfectly.
Other mezze dishes like hummus, baba ganoush, or marinated olives. These peppers fit naturally into a Mediterranean spread.
I’ve also chopped leftover roasted peppers and tossed them with pasta, added them to sandwiches, or served them over grilled fish. They’re versatile beyond the initial serving.
Variations and Customizations
Add anchovies: Lay a few anchovy fillets over the peppers after roasting for salty, umami depth. This is traditional in some Mediterranean preparations.
Include capers: Scatter a tablespoon of drained capers over the finished dish for briny pops of flavor.
Make it spicy: Add red pepper flakes or a fresh sliced chili pepper if you want heat. Shepherd peppers are sweet and mild, so heat has to come from elsewhere.
Use different herbs: Mint instead of parsley creates a completely different flavor profile, more Turkish/Middle Eastern. Basil works too, though it’s less traditional.
Add yogurt: Serve with a dollop of thick Greek yogurt or labneh on the side. The cool, tangy dairy contrasts beautifully with the smoky peppers.
Storing and Reheating
These peppers keep well in the fridge for 3-4 days in an airtight container. The flavor actually improves after a day as everything marinates together. Bring them to room temperature before serving for best flavor.
Don’t reheat them. Seriously. These are meant to be served at room temperature. Reheating makes them mushy and dulls the bright flavors from the lemon and parsley. Just pull them from the fridge 30 minutes before serving.
You can roast the peppers ahead of time and store them plain (without seasonings) for up to a week. Season them fresh when you’re ready to serve.
The Turkish Tradition
Fire-roasted peppers are common across Mediterranean and Middle Eastern cuisines, but Shepherd peppers specifically are a Turkish staple. In Turkey, these peppers (called sivri biber) are served as part of mezze spreads, alongside grilled meats, or simply with bread and cheese as a light meal.
The technique of charring directly over flame is ancient, it predates ovens and creates flavors impossible to achieve through indirect heat. This isn’t fusion cuisine or modern innovation. It’s simple food done the way it’s been done for centuries, and that’s why it works so well.
Final Thoughts
Making fire-roasted Shepherd peppers changed how I think about vegetable dishes. You don’t need complicated recipes or long ingredient lists to create something memorable. You need good ingredients, proper technique, and the confidence to char the hell out of some peppers over open flame.
The first time I made these for friends, they scraped the plate clean and asked for the recipe. One friend said, “This tastes like vacation.” She was right, there’s something about the combination of smoke, lemon, garlic, and olive oil that transports you somewhere warmer and more relaxed.
Is it authentic Turkish cooking? I’m not Turkish, so I’m not claiming this is how it’s done in Istanbul. But it’s inspired by those traditions, uses the right peppers, and most importantly, it tastes fantastic. That’s what matters.
So fire up your stove, grab some Shepherd peppers next time you see them, and embrace the char. Let your kitchen fill with smoke. Get those peppers blackened and blistered. Your neighbors might knock on your door too, but hey, that’s what happens when something smells this good.
Now if you’ll excuse me, I’ve got peppers calling my name and an open flame waiting. Time to cook.