
These Italian style breaded chicken cutlets deliver crispy, golden exteriors and tender, juicy interiors through a classic three-step breading process. The technique, fundamental to Italian and European cooking, creates a protective coating that seals in moisture while developing satisfying crunch during frying. Fresh parsley and Parmesan mixed into the breadcrumbs elevate the coating beyond plain breading, adding aromatic and savory complexity.
The result is a versatile dish that serves equally well as a simple family dinner, sliced over salad, tucked into sandwiches, or presented as an elegant main course. Success depends on proper breading technique, correct oil temperature, and avoiding overcooking the delicate chicken 😋.
Understanding Breading Technique and Chicken Preparation
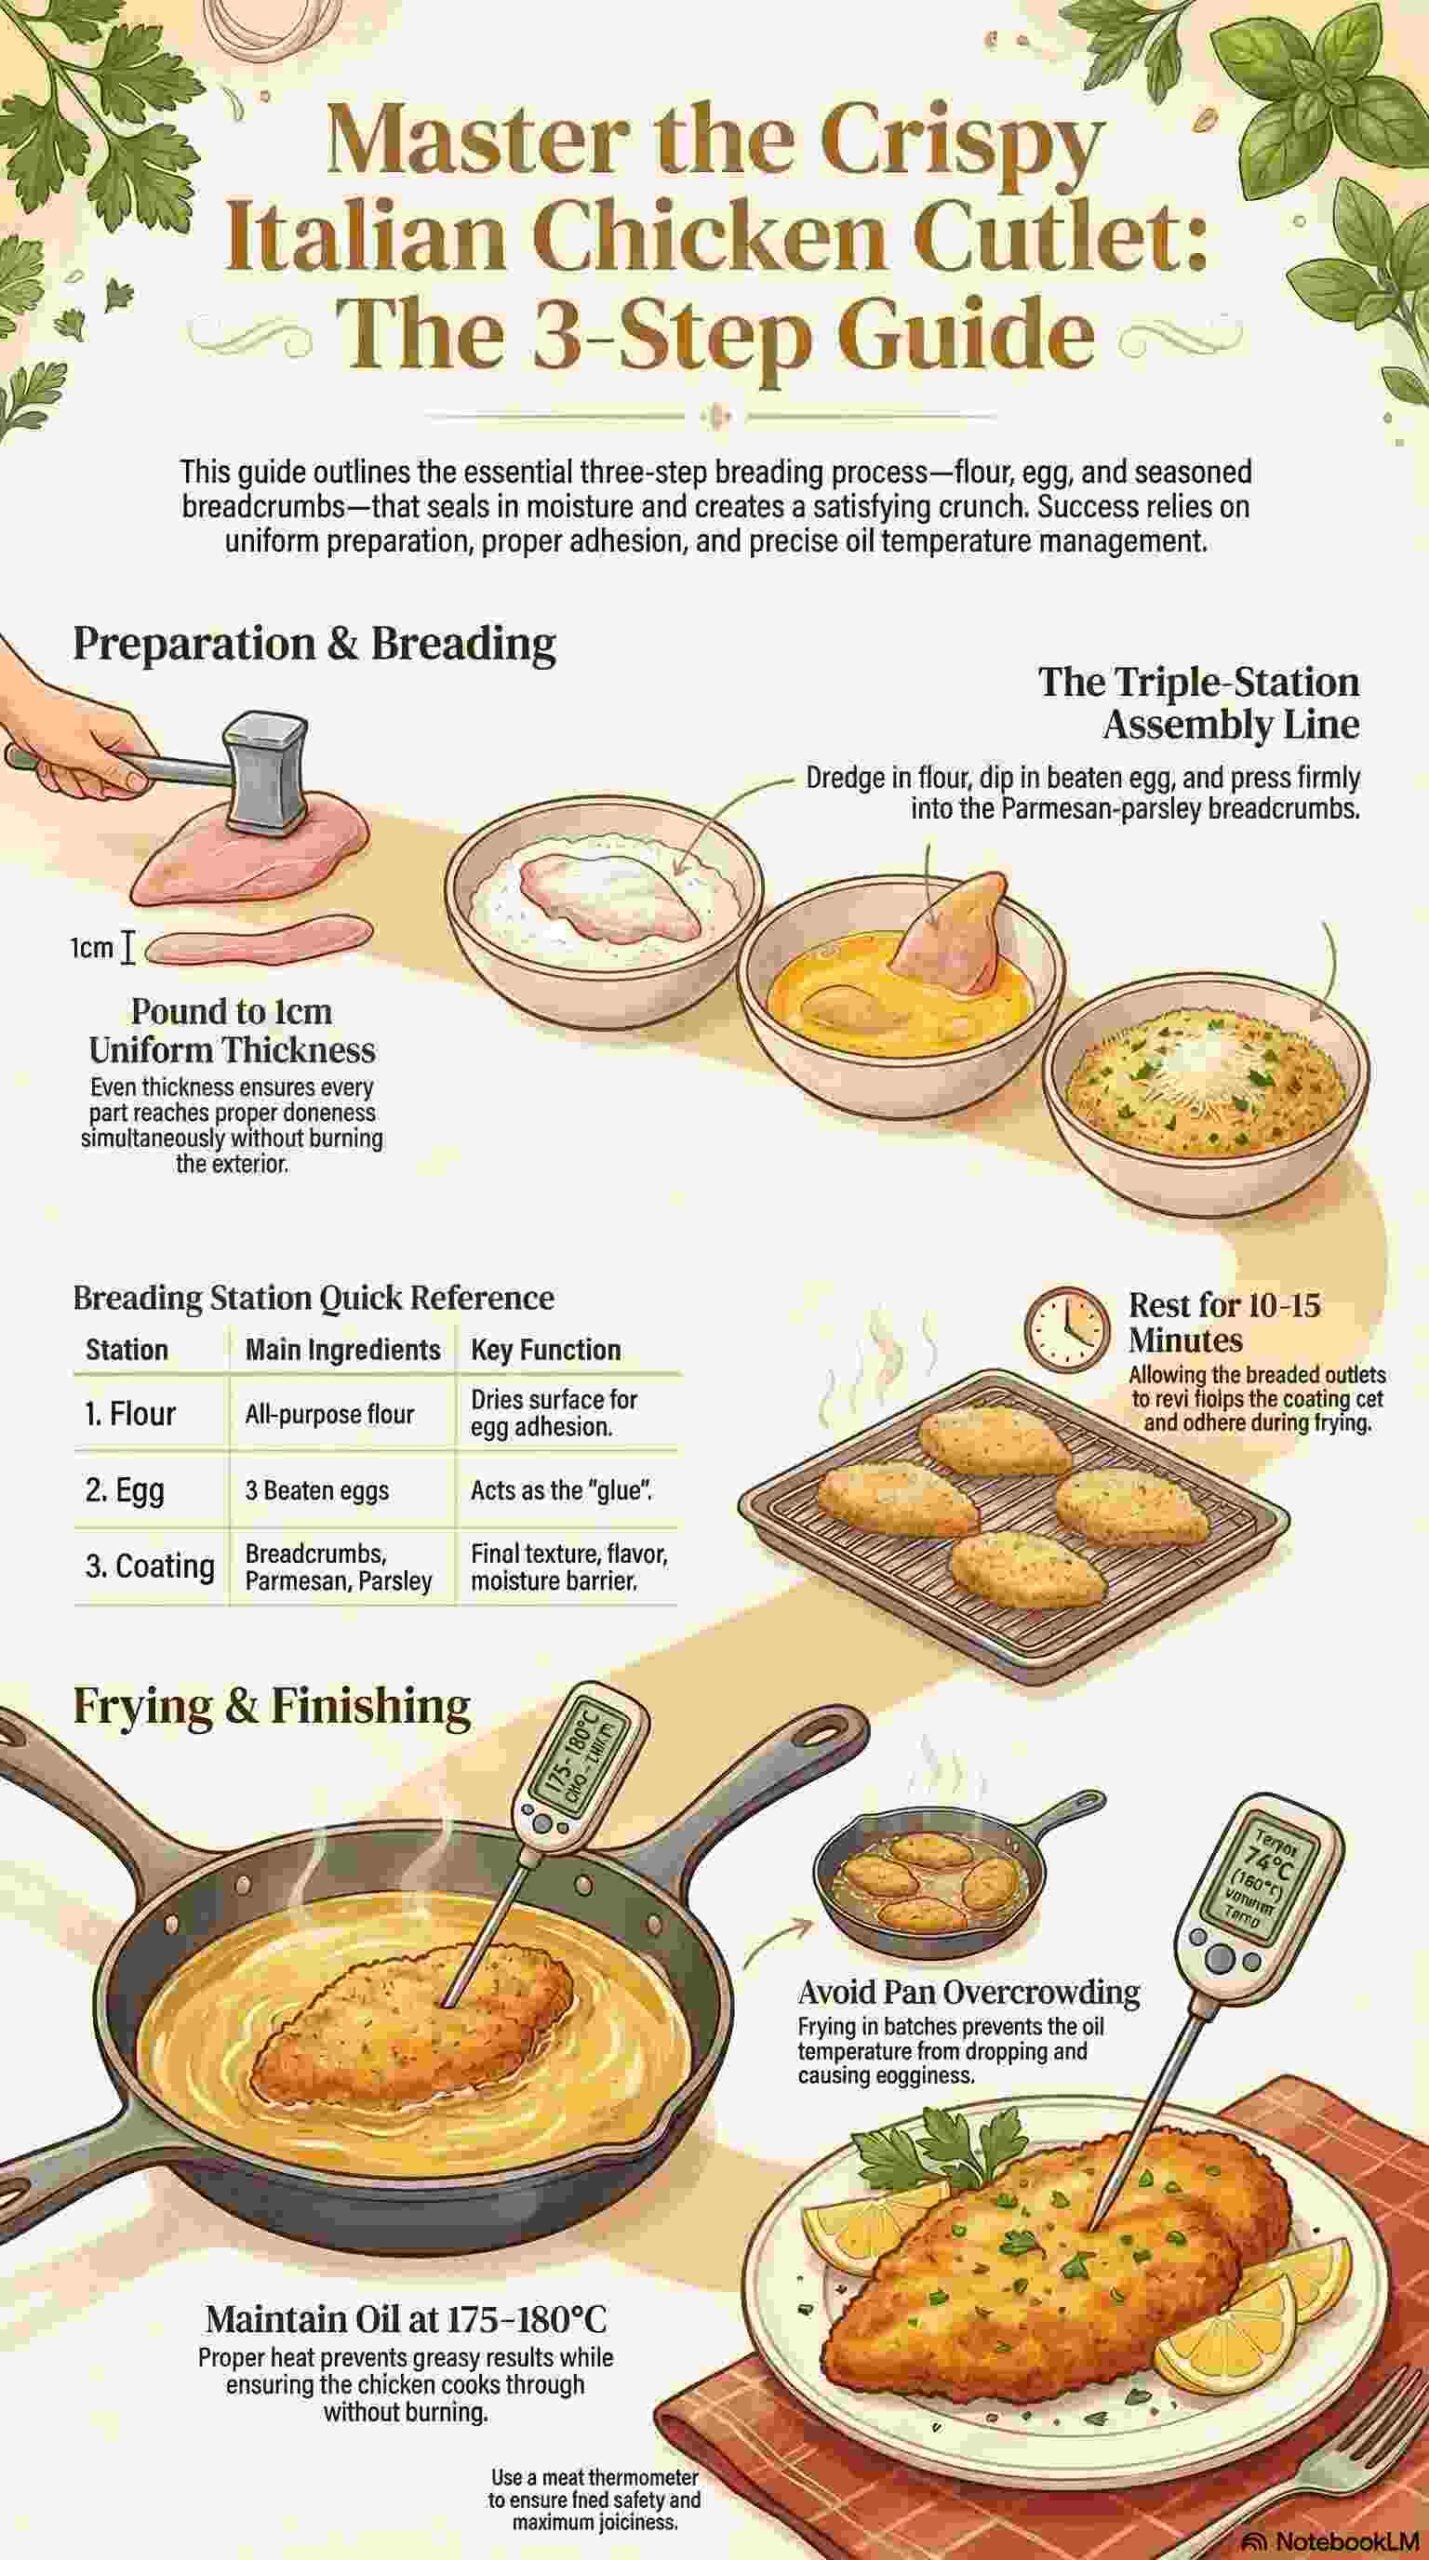
The three-step breading process (flour, egg, breadcrumbs) creates layers that work together to produce superior results. The flour dries the meat’s surface and creates a base for the egg to adhere. The egg acts as glue, binding the breadcrumb coating to the chicken. The breadcrumbs provide texture, flavor, and a barrier that prevents moisture loss during cooking.
Thin, even cutlets cook quickly and uniformly, preventing the common problem of burnt coating with raw interior. Pounding chicken breasts to uniform thickness ensures every part reaches proper doneness simultaneously. The technique appears throughout Italian cuisine in preparations like cotoletta alla milanese (Milanese-style cutlet) and pollo alla parmigiana (chicken Parmesan, which uses these cutlets as its base).
Ingredients
Ingredients for Chicken Cutlets
For the Chicken- 3 large boneless, skinless chicken breasts (approximately 600 to 750g total)
- Salt to taste
- Freshly ground black pepper to taste
- 100g all-purpose flour (approximately ¾ cup) for dredging
- 3 large eggs
- 150g breadcrumbs (approximately 1½ cups), preferably plain or Italian-style
- 3 tablespoons fresh flat-leaf parsley, finely chopped
- 50g Parmesan cheese, finely grated (approximately ½ cup)
- Additional salt and pepper for the breadcrumb mixture (optional)
- Olive oil or vegetable oil for frying (approximately 250 to 375ml or 1 to 1½ cups, depending on pan size)
Ingredient Selection and Quality
Chicken Breast Quality and Preparation
Choose fresh, plump chicken breasts with no discoloration or off odors. Organic or free-range chicken offers superior flavor and texture compared to conventional chicken, though either works functionally. Each breast should weigh approximately 200 to 250g.
To create thin cutlets, place each breast on a cutting board and, using a sharp knife held parallel to the board, slice horizontally through the breast to create two thinner pieces. Each whole breast should yield two cutlets. Alternatively, butterfly the breast by cutting almost all the way through horizontally, then opening it like a book.
After slicing, place the cutlets between two sheets of plastic wrap or parchment paper and pound gently with a meat mallet or heavy pan until approximately 1cm (⅜ inch) thick and uniform throughout. This thickness allows quick, even cooking. According to the USDA Food Safety and Inspection Service, chicken should be cooked to an internal temperature of 74°C (165°F) for food safety.
Breadcrumb Selection
Plain breadcrumbs provide a neutral base that allows the Parmesan and parsley to shine. Italian-style breadcrumbs (pre-seasoned with herbs) work but will create different, more aggressively seasoned results.
Fresh vs. dried: Dried breadcrumbs (from the store) create crispier coating than fresh breadcrumbs (made from fresh bread). For this preparation, use dried breadcrumbs.
Panko option: Japanese panko breadcrumbs create extra-crispy, lighter coating due to their larger, airier flake structure. They work excellently here, though they create slightly different texture than traditional Italian breadcrumbs.
Make breadcrumbs at home by processing stale bread in a food processor, then toasting lightly for superior flavor and texture.
Parmesan Quality
Authentic Parmigiano-Reggiano, grated fresh, provides incomparably superior flavor to pre-grated domestic “parmesan.” The aged cheese contributes nutty, salty depth essential to the coating. Grate it finely so it distributes evenly throughout the breadcrumbs.
Parsley Selection
Fresh flat-leaf (Italian) parsley is essential. Curly parsley has inferior flavor and tougher texture. The parsley should be chopped finely so it integrates into the coating rather than creating large green pieces that fall off during frying.
Oil for Frying
Extra virgin olive oil creates authentic Italian flavor but has a lower smoke point (approximately 190°C/375°F) that limits frying temperature. Regular olive oil (not extra virgin) or blended vegetable oils offer higher smoke points and work well for frying. Avoid strongly flavored oils that would compete with the chicken. According to the North American Olive Oil Association, different olive oil grades have different smoke points and best uses in cooking.
Method
Prepare the Chicken
1. Slice into cutlets: If not already done, slice each chicken breast horizontally to create two thinner pieces. You should have 6 cutlets total from 3 breasts.
2. Pound to even thickness: Place each cutlet between plastic wrap or parchment paper. Using a meat mallet, rolling pin, or heavy pan, pound gently from the center outward until the cutlet is approximately 1cm (⅜ inch) thick and uniform throughout. Work gently to avoid tearing the meat. The cutlets should be relatively even in thickness so they cook uniformly.
3. Season: Pat the cutlets dry with paper towels. Moisture prevents breading adhesion. Season both sides of each cutlet with salt and freshly ground black pepper. Let them rest for 5 to 10 minutes at room temperature while you prepare the breading station. This allows the seasoning to penetrate slightly and brings the chicken closer to room temperature for more even cooking.
Set Up the Breading Station
1. Organize three stations: Arrange three wide, shallow dishes (plates, pie plates, or shallow bowls) in a row on your work surface.
Plate 1 (Flour station): Place the all-purpose flour in the first dish.
Bowl (Egg station): Crack the 3 eggs into a bowl and beat them thoroughly with a fork or whisk until completely combined and no streaks of white or yolk remain. The eggs should be uniform in color and slightly frothy.
Plate 2 (Breadcrumb station): In the third dish, combine the breadcrumbs, finely chopped parsley, and grated Parmesan cheese. Mix thoroughly with a fork until the parsley and cheese distribute evenly throughout the breadcrumbs. If desired, add a pinch of salt and pepper to the breadcrumb mixture, though this is optional as the chicken is already seasoned and the Parmesan contributes salt.
2. Prepare a landing zone: Set out a clean plate or baking sheet where you’ll place the breaded cutlets before frying.
Bread the Chicken
1. Use the assembly line method: Working with one cutlet at a time, move through all three stations systematically. This keeps one hand relatively dry for handling raw chicken while the other becomes the “wet hand” for the egg station.
2. Dredge in flour: Place a cutlet in the flour and turn it to coat both sides completely. Shake off excess flour vigorously so only a thin, even coating remains. Too much flour creates pasty, thick coating rather than delicate crust. The flour should be barely visible on the chicken.
3. Dip in egg: Transfer the floured cutlet to the beaten eggs. Turn it to coat both sides completely, allowing excess egg to drip back into the bowl. The egg coating should be thorough but not excessively thick.
4. Coat with breadcrumbs: Transfer the egg-coated cutlet to the breadcrumb mixture. Press the breadcrumbs firmly onto both sides of the cutlet, ensuring complete, even coverage. Press gently but firmly so the coating adheres well. Pay special attention to the edges and any thicker parts. The cutlet should be completely covered with breadcrumbs with no bare spots showing.
5. Rest the breaded cutlets: Place the breaded cutlet on the prepared plate. Repeat with all remaining cutlets. Once all are breaded, let them rest for 10 to 15 minutes before frying. This resting period allows the coating to set and adhere more firmly, reducing the likelihood of it falling off during frying.
Fry the Cutlets
1. Heat the oil: Pour enough oil into a large, heavy-bottomed skillet or frying pan to reach a depth of approximately 5mm to 1cm (¼ to ⅜ inch). Place over medium to medium-high heat and heat until the oil reaches approximately 175 to 180°C (350 to 360°F). Test the temperature by dropping a small pinch of breadcrumbs into the oil; they should sizzle immediately and brown within 30 to 45 seconds. Alternatively, use a thermometer for accuracy.
Proper oil temperature is crucial. Too-cool oil produces greasy, soggy coating as the chicken absorbs oil rather than crisping. Too-hot oil burns the coating before the chicken cooks through.
2. Fry in batches: Working in batches to avoid overcrowding (overcrowding lowers oil temperature and causes uneven cooking), carefully place 2 to 3 cutlets in the hot oil, depending on pan size. Don’t move them immediately; let them fry undisturbed for 3 to 4 minutes until the bottom develops deep golden-brown color.
3. Flip and finish: Using tongs or a slotted spatula, carefully flip each cutlet and fry the second side for another 3 to 4 minutes until equally golden brown. The total frying time is typically 6 to 8 minutes, depending on thickness. The coating should be crispy and deep golden, and the chicken should reach an internal temperature of 74°C (165°F) when measured with an instant-read thermometer inserted into the thickest part.
4. Drain: Transfer the cooked cutlets to a plate lined with paper towels to drain excess oil. The paper absorbs surface oil, preventing sogginess.
5. Maintain oil temperature: Between batches, allow the oil to return to proper temperature (175 to 180°C) before adding more cutlets. Add more oil if needed to maintain consistent depth.
Finish and Serve
1. Season immediately: While the cutlets are still hot, sprinkle them lightly with additional salt if needed. Taste a piece to determine if more salt is necessary.
2. Serve hot: Chicken cutlets taste best served immediately while the coating is at peak crispness. Transfer to serving plates or a platter.
3. Optional garnishes: Serve with lemon wedges for squeezing over the top, which adds brightness. Fresh parsley, additional grated Parmesan, or a drizzle of extra virgin olive oil also enhance presentation and flavor.
Technical Notes on Success
Several factors determine whether chicken cutlets achieve crispy coating and juicy interior:
Even thickness is essential: Unevenly pounded chicken cooks unevenly, with thin portions drying out before thick portions cook through.
Dry chicken before breading: Moisture prevents flour adhesion, which compromises the entire coating. Pat thoroughly dry.
Shake off excess flour: Too much flour creates thick, pasty coating rather than delicate crust.
Press breadcrumbs firmly: Gentle pressing ensures the coating adheres well and doesn’t fall off during frying.
Proper oil temperature: The 175 to 180°C (350 to 360°F) range is ideal for creating crispy coating without burning while cooking the chicken through.
Don’t overcrowd the pan: Overcrowding lowers oil temperature dramatically, producing greasy rather than crispy results.
Let coating set before frying: The 10 to 15 minute rest after breading allows the coating to adhere more firmly.
Don’t move cutlets immediately: Let them fry undisturbed for the first 2 to 3 minutes so the coating sets and develops crust before flipping.
Serving Suggestions
This recipe makes 6 cutlets, serving 4 to 6 people depending on appetite and accompaniments.
As a main course: Serve with roasted vegetables, mashed potatoes, salad, or pasta.
Chicken Parmesan: Top with marinara sauce and mozzarella, then broil until the cheese melts.
Sandwiches: Serve on crusty rolls with lettuce, tomato, and mayonnaise or aioli.
Over salad: Slice cutlets and serve over mixed greens with vinaigrette.
With pasta: Serve alongside or on top of pasta with simple tomato sauce.
Wine pairings: Medium-bodied whites like Pinot Grigio or Chardonnay, or light reds like Pinot Noir complement the dish well.
Variations and Adaptations
Herb variations: Add dried oregano, basil, or Italian seasoning to the breadcrumb mixture.
Spicy version: Add red pepper flakes or cayenne to the breadcrumb mixture for heat.
Lemon-herb: Add lemon zest to the breadcrumbs for bright citrus flavor.
Garlic addition: Add garlic powder to the breadcrumb mixture for additional depth.
Different cheeses: Replace or supplement Parmesan with Pecorino Romano, Asiago, or Grana Padano.
Nut coating: Add finely ground almonds or hazelnuts to the breadcrumb mixture for nutty flavor and extra crunch.
Baked version: For healthier preparation, spray breaded cutlets with oil spray and bake at 200°C (400°F) for 15 to 20 minutes, flipping halfway through. The texture won’t match fried cutlets but produces acceptable results.
Different proteins: This breading technique works equally well with pork cutlets, veal, turkey, or firm fish like cod or halibut.
Storage and Reheating
Refrigeration: Cooked cutlets keep refrigerated in an airtight container for up to 3 days. The coating softens during storage.
Reheating: Reheat in a 180°C (350°F) oven for 10 to 12 minutes to restore some crispness. Microwave reheating is faster but makes the coating soggy.
Freezing: Freeze either breaded but uncooked cutlets, or fully cooked cutlets. For uncooked, freeze on a baking sheet until solid, then transfer to freezer bags for up to 3 months. Fry from frozen, adding 2 to 3 minutes to cooking time. For cooked cutlets, cool completely before freezing for up to 2 months. Thaw and reheat in the oven.
Make-ahead strategy: Bread the cutlets several hours ahead and refrigerate until ready to fry. This actually improves coating adhesion.
Cultural Context and Italian Tradition
Breaded cutlets appear throughout Italian cuisine, from the famous cotoletta alla milanese (Milan’s veal cutlet, traditionally bone-in) to simpler chicken and pork preparations found in home kitchens across Italy. The technique reflects Italian resourcefulness: transforming relatively inexpensive cuts into appealing, satisfying meals through proper technique.
Italian-American communities embraced chicken cutlets enthusiastically, making them staples of red-sauce restaurants and home cooking. The cutlets serve as foundation for chicken Parmesan, one of Italian-American cuisine’s most iconic dishes, though they’re equally delicious served simply with lemon.
These chicken cutlets demonstrate how fundamental techniques, when executed properly, elevate simple ingredients into something special. The contrast between crispy, flavorful coating and tender, juicy chicken creates satisfaction that belies the straightforward preparation. It’s cooking that honors tradition while remaining accessible, producing results that work for both casual family meals and occasions requiring something more refined.